
Insights and musings about photography and the creative process

How Blue Balls Helped Me See the Light
Sadly, my alma mater, the Brooks Institute of Photography, is no more. But while it existed, it was one of the premier institutions of photography education, and a few foundational assignments at Brooks achieved legendary status among the student body: The Grey Box. Black Glass. The Mission Shot. Each is deceptively simple at first glance, yet fiendishly designed to expose the slightest flaw in your understanding or execution of the knowledge they were meant to impart.

The infamous Brooks Institute Blue Balls
Sadly, my alma mater, the Brooks Institute of Photography, is no more. But while it existed, it was among the premier institutions of photography education. A few foundational assignments at Brooks achieved legendary status among the student body: The Grey Box. Black Glass. The Mission Shot. Each deceptively simple at first glance yet fiendishly designed to expose the slightest flaw in your understanding or execution.
One I’ll never forget—both because of what I learned and its title—was "The Blue Balls". Brooks instructors were crafty, but they also had a sense of humor.
Decades have blurred the details, but the core memory remains clear: carrying around a contraption made of a racquetball and a shiny blue Christmas ornament, mounted on rods and connected by a piece of 2x4.
Our task was to photograph this rig under various lighting conditions: full sun, cloudy days, open shade, window light, etc. Afterwards, we recorded our observations in another Brooks icon, the Comp book, describing in painful detail the qualities of the highlights, shadows and transitions.
Both balls were blue, hence the name, but their color had nothing to do with the point of the assignment. This odd rig was a lesson in paying attention. Admittedly, I didn’t appreciate the value of the exercise at the time – ok, my classmates and I thought it was Dumb with a capital D. But hindsight – as it so often does – has enlightened my perspective. Paying attention taught me to see beyond light and dark and notice the nuances of texture, transitions and mood.


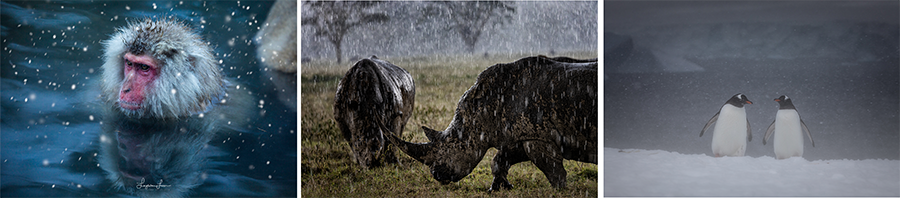
Blue balls in Sunlight, Shade, Window Light & Cloudy lighting. Photos: © Google Gemini?
Becoming a Connoisseur of Light
The more you study a subject, the more you become aware of its subtleties.
The average imbiber’s ‘tastes good’ is probably quite different than a sommelier’s experience of the tannins and terroir in a sip of fine wine. I’m no birder, but learning a few bird-watching basics expanded the world of ‘little brown birds’ to a universe of sparrows, juncos, and chickadees. Dentists can’t help noticing coffee-stained teeth and receding gums.
What’s your area of expertise? What do you see that a layperson never notices?
It’s the same with light – the more you observe, the more you pay attention, the more you see.
Brave New World
It’s embarrassing how long I’ve been meaning to write this article. So many distractions, so many excuses. So many hours searching for the exact shade of blue ornament of my memories. Procrastination is a wonderful thing! 🙄
But this year would be different. A trip to Home Depot for grey paint and dowels. Racquetballs and ornaments from Amazon. The writing would begin as soon as I built that Blue Balls contraption!
But then I thought, what about AI?
All of the Blue Balls images in this article were generated by Google Gemini from a description I typed. What do you think? Did you suspect? Now that you know, can you tell?
Obviously, I think the AI “photographs” are usable for my purposes. The initial image Gemini produced is pretty much the exact picture I envisioned. But what really impressed me were the variations it came up with based on the different lighting conditions I described. There's no doubt Gemini understands the properties of light and how it reacts with different surfaces.
It made me think, is AI the ultimate tool for learning or teaching photography?
Is AI good or bad for photography, for humanity? A dream or a nightmare? These are questions for another time and a higher pay grade.
All I know is AI is here and we’re living in a Brave New World.
The Lexicon of Light
Learning the language and terminology of the subject you’re studying is always helpful.
Eye-line, rufous, and malar weren’t in my vocabulary before I started paying attention to birds but knowing these words helps me quickly distinguish similar species.
When it comes to light, some words photographers should be familiar with include:
Specular – hard light, the sun on a blue-sky day. It creates bright highlights, dark shadows, and sharp transitions. Models look good in hard light; soft light is more flattering for mere mortals. Grand landscapes in hard light rarely inspire, they just make you want to squint.
Specular can also refer to the shiny surface quality of things like the Christmas ornament, cars, jewelry, or a still mountain lake. The key to photographing specular objects is understanding you’re really photographing the reflection. That's why your car looks amazing after a wash—you're really admiring how well it reflects the world around it.
Diffuse – soft light, cloudy days or shade. Diffuse lighting results in less contrast, softer transitions. Window light is considered diffuse as long as the sun isn’t streaming directly through it. It’s a portrait photographer's secret weapon and why we see so many Instagram shots by the café window.
Ready to take off the training wheels? Seeing the subtleties of Contrast & Color is where even experienced photographers often struggle, especially when it comes to post processing their images. My fellow Brookies & I were ‘blessed’ with merciless instructors and endless repetition. But we lacked the benefit of YouTube and the instant feedback of digital photography. You don’t need a formal education in photography to learn these lessons. But you do need to pay attention…and practice.
Your Teacher Awaits
Lessons From Your Kitchen Blender
I’d love for you to join us on one our photography adventures, but the truth is you don’t need to go anywhere to learn about light. After all, light is everywhere. You don’t even need a camera. You just need to pay attention.
I can’t help noticing whether its finches or towhees visiting our feeder nor the way the light falls on the face of the person I’m talking to nor the choices the cinematographer made in the movie I’m watching.
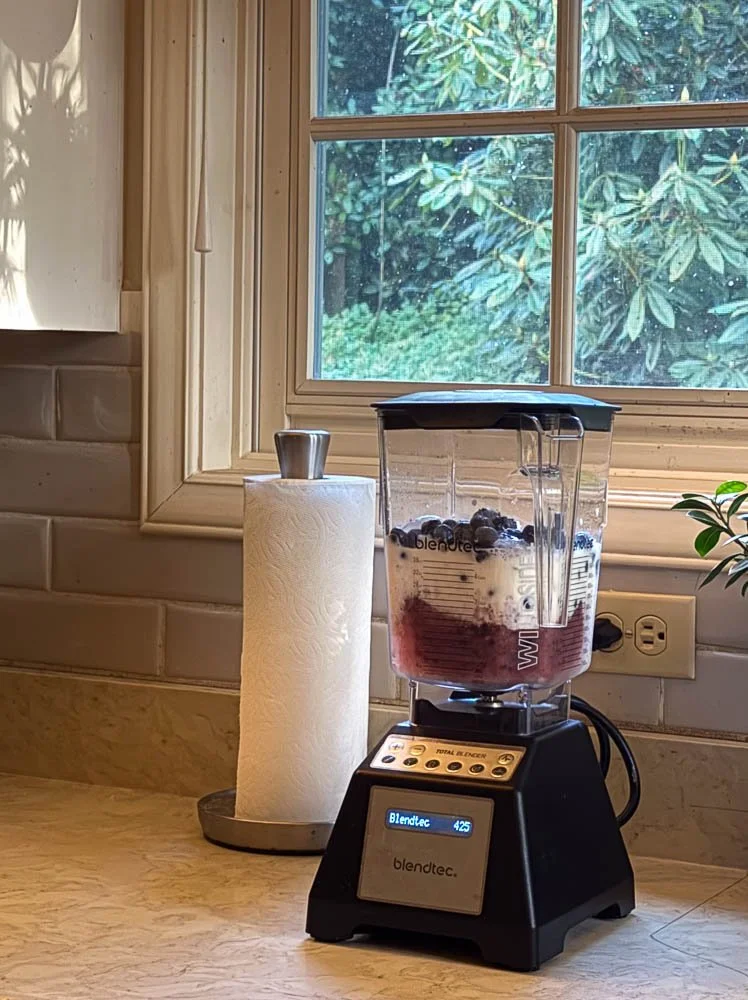
You might notice the beautiful way the early light illuminates the blender you use to make your morning smoothie.
Will noticing make you a better photographer? I think so, but what I can promise is that noticing light will make your life experience richer. It’s what I call the Gift of Seeing. But that’s another topic for another time.
So start small. Take a moment to notice the light in your kitchen (or bedroom or backyard) tomorrow morning. That's your Blue Balls assignment.
Try it, you’ll See. 😉

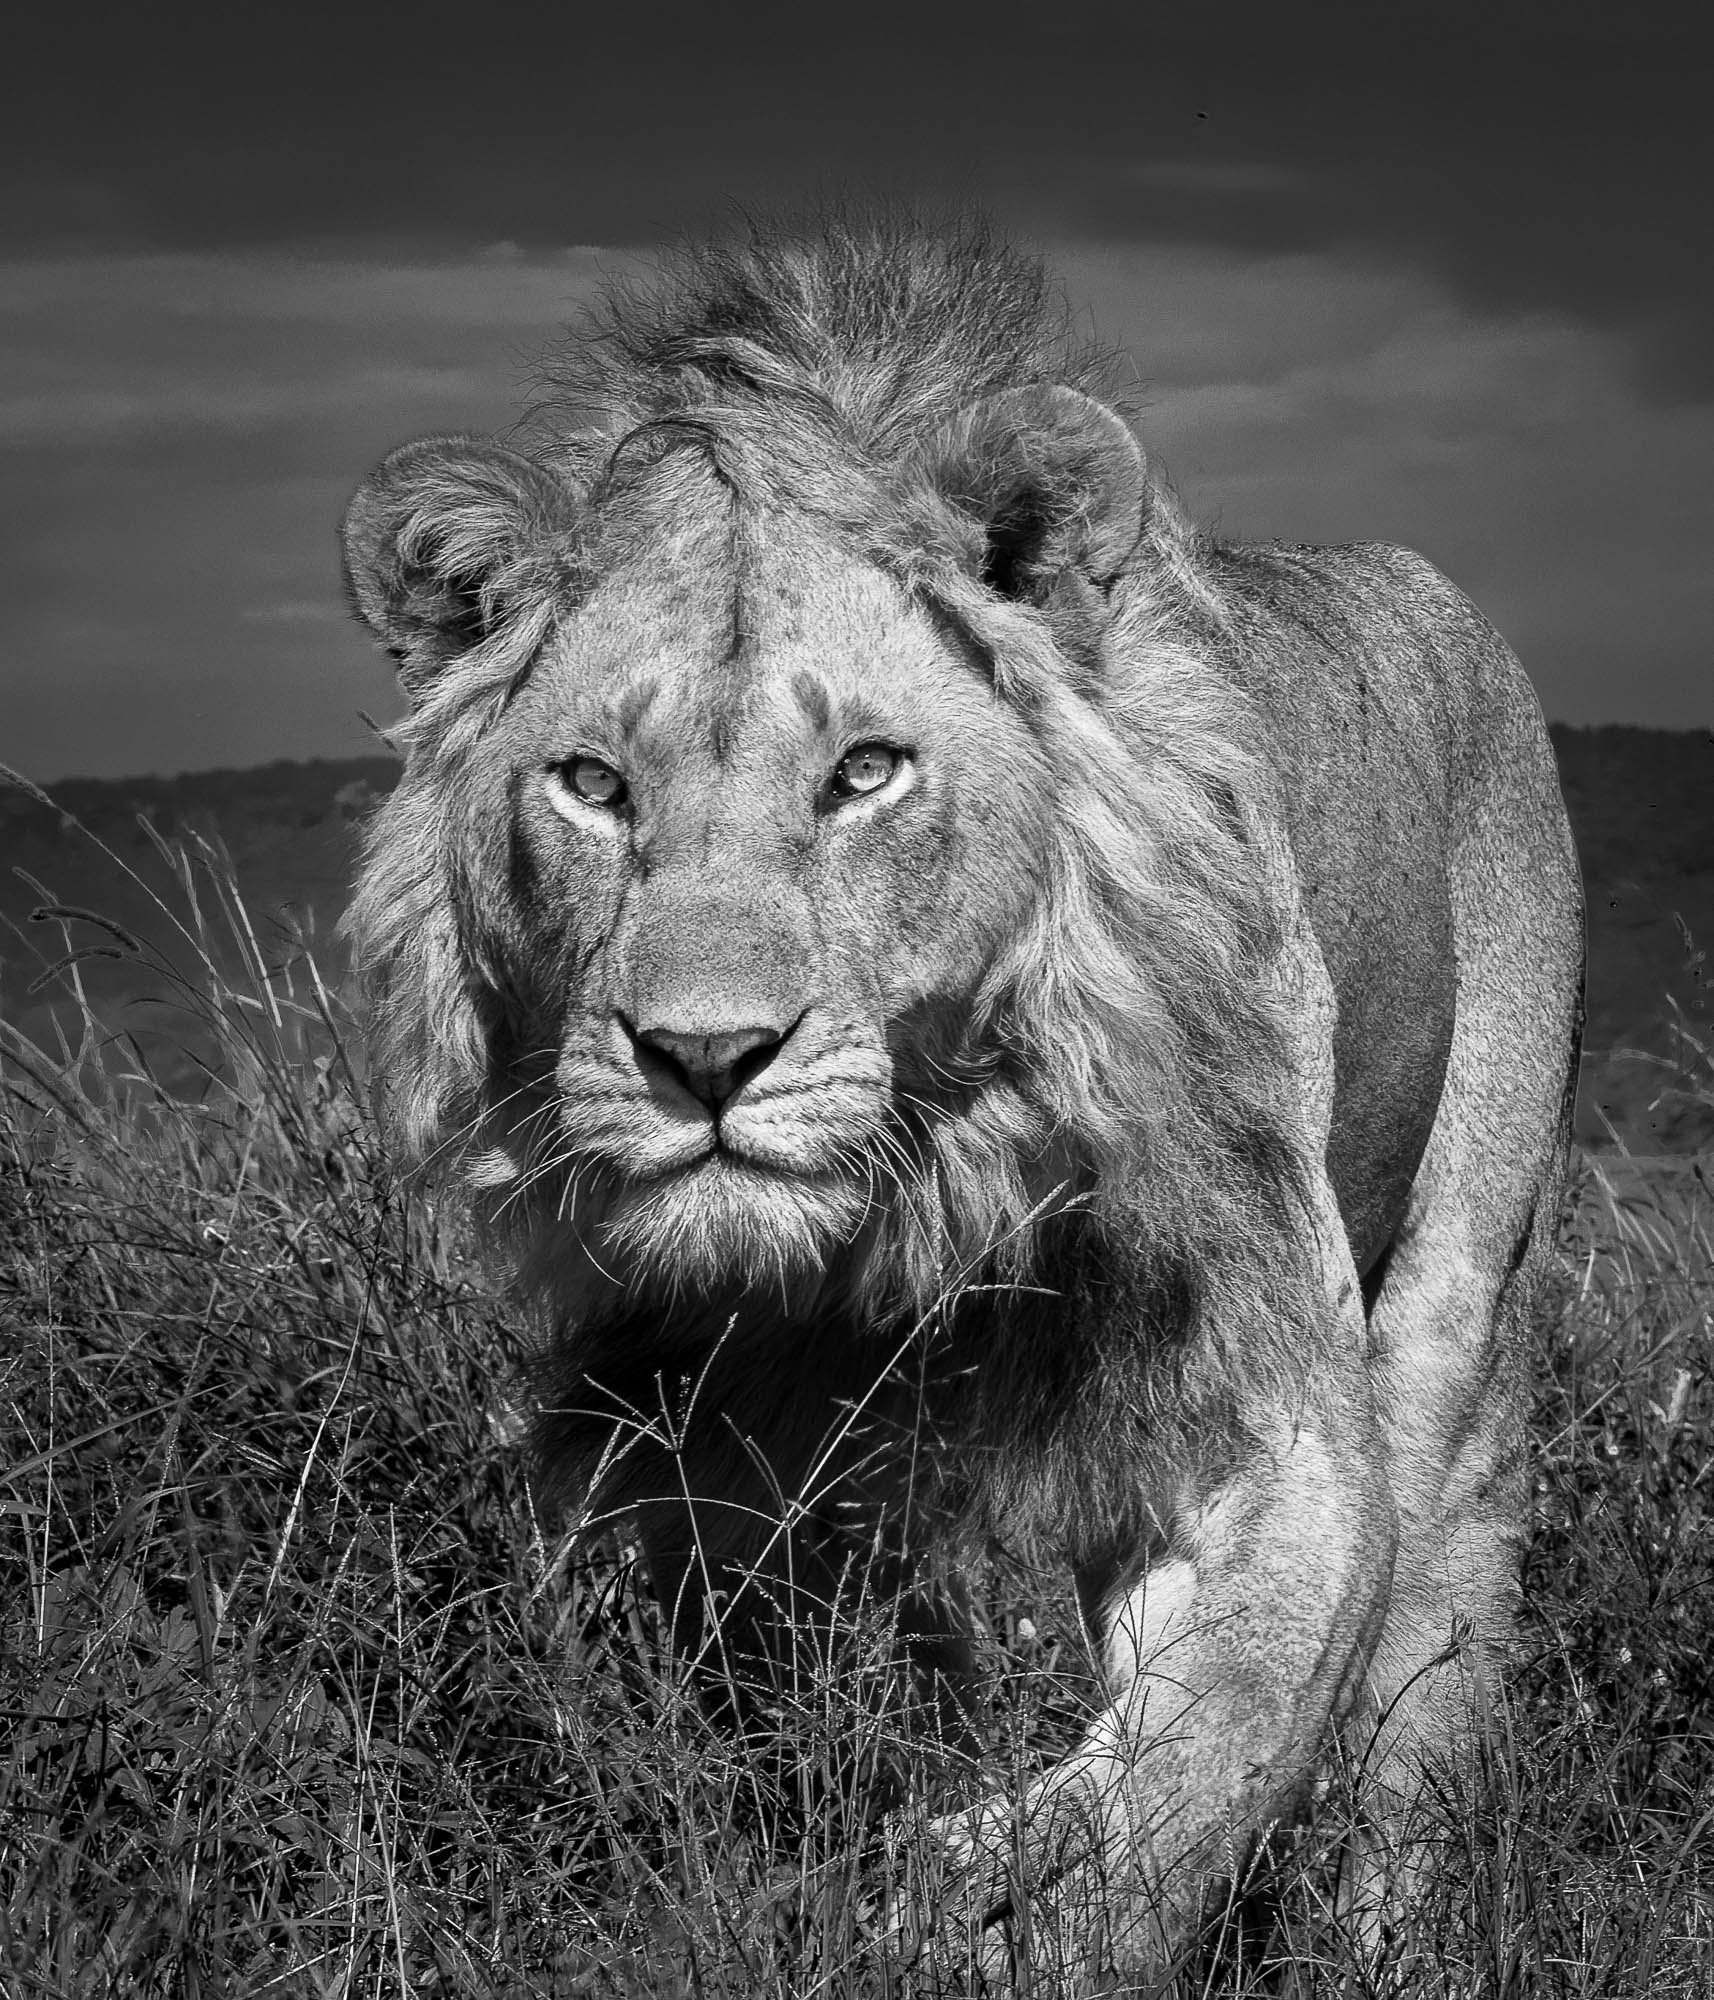
15mm for Wildlife Photography?
In our Africa workshops—and in just about every conversation we have about photographing wildlife—we’re always preaching one thing: get low. Getting down to the animal’s eye level transforms your photos. Suddenly, you’re no longer just a bystander…
In our Africa workshops—and in just about every conversation we have about photographing wildlife—we’re always preaching one thing: get low. Getting down to the animal’s eye level transforms your photos. Suddenly, you’re no longer just a bystander; you’re in the scene. The background comes alive, the world feels bigger, and your subject feels more intimate, more powerful. It’s humbling and thrilling all at once—because when you’re eye to eye with a lion or a leopard, you realize who’s really in charge out there.
So… what if we took it a step further? What if we went wide? A wide-angle lens, say a 15mm, might not be the first thing that comes to mind for wildlife—but it can create some seriously jaw-dropping perspectives. When used creatively, a wide lens brings the environment and the animal together into one storytelling frame. You’re not just photographing the subject; you’re photographing the moment, the habitat, and the feeling of being there.
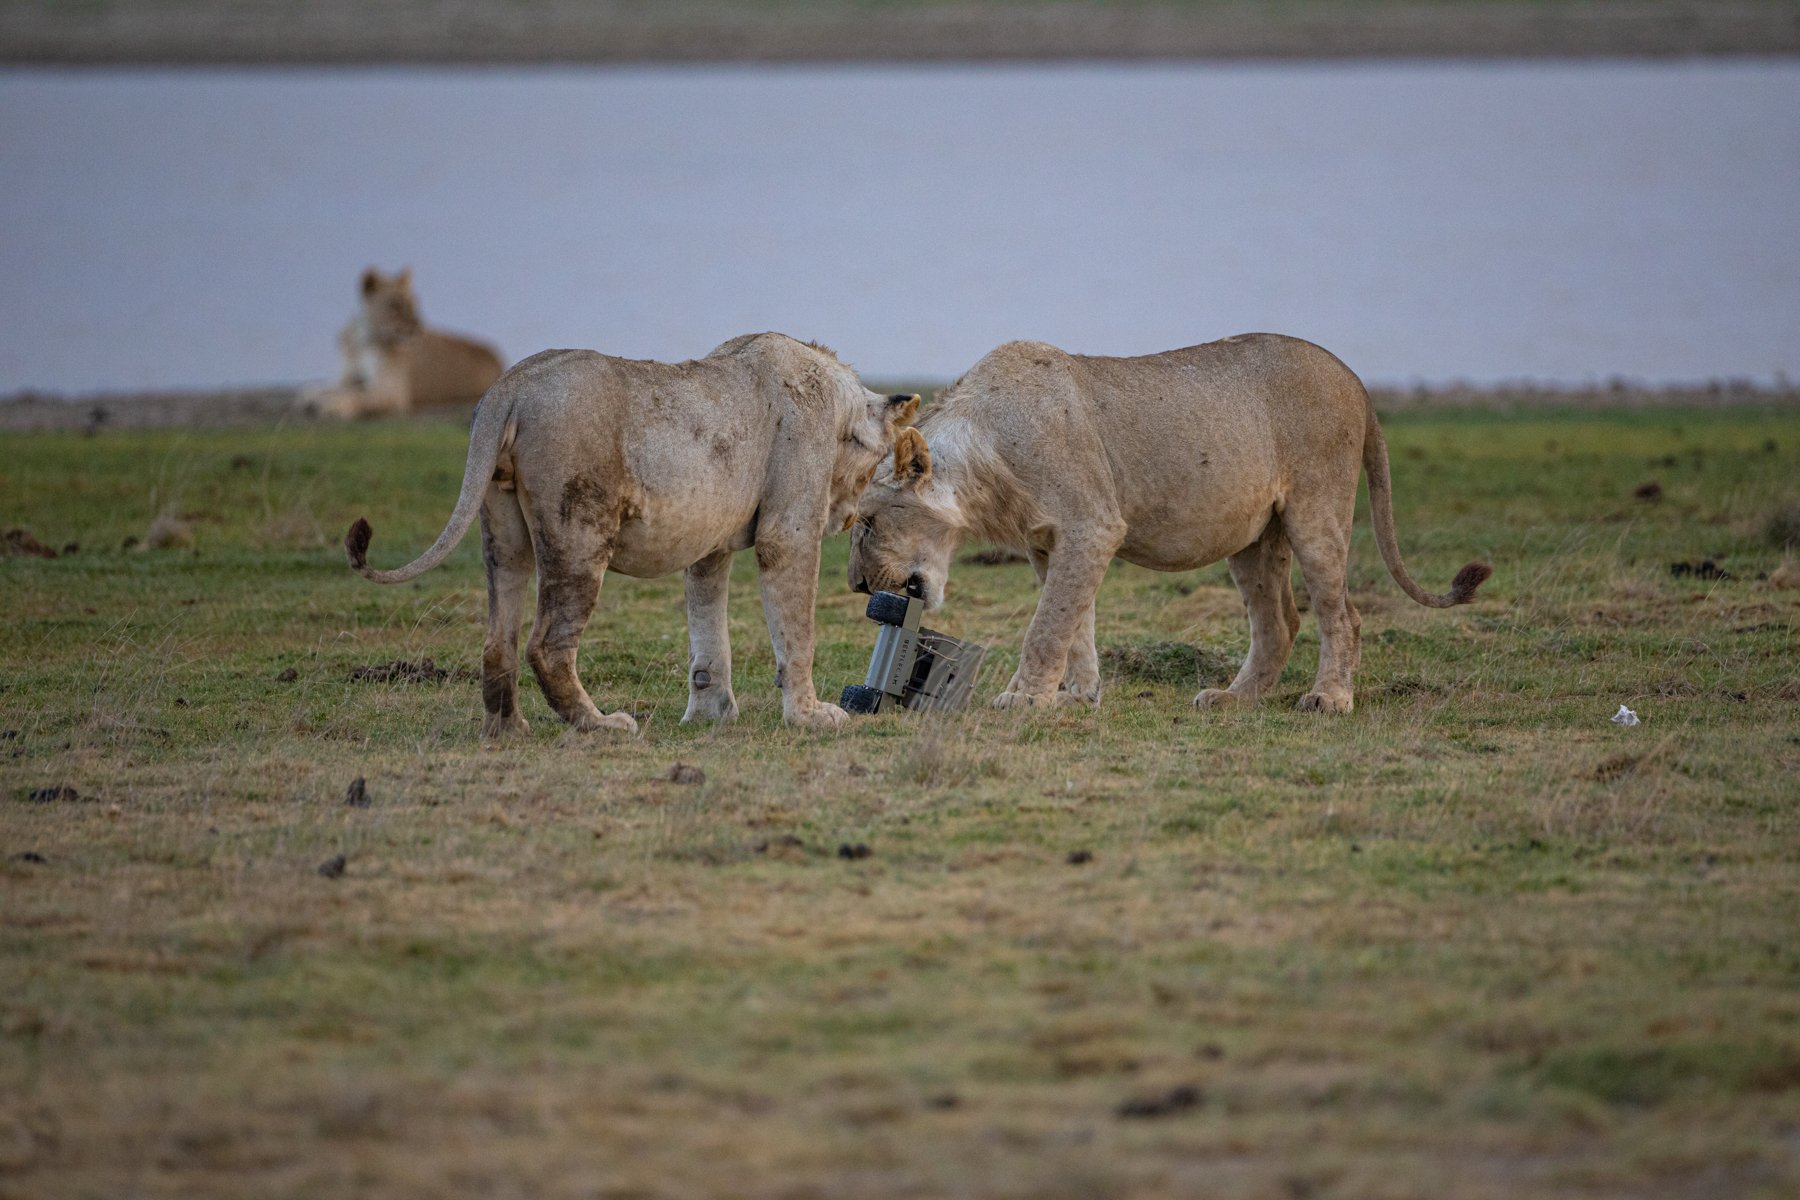
Now, before you crawl up to an elephant with a 15mm lens (please don’t), let’s talk about how to pull this off safely. Low wide-angle wildlife photography is where creativity meets engineering. Camera traps, wireless remotes, and even small remote-controlled vehicles can help you capture that ultra-close, wide perspective—without putting yourself in harm’s way. This is where photography turns into a bit of mad science: experimenting, adapting, and finding clever ways to make the impossible shot possible. It’s challenging, it’s exciting, and it’s the kind of photography that keeps you up at night thinking, what if I tried this next time…?
Of course, ethics always come first. Wide-angle wildlife photography demands patience, respect, and a deep understanding of your subject. Never chase, harass, or interfere with wildlife—ever. The animal’s safety (and comfort) must always come before the shot. Success comes from observing behavior, learning patterns, and working with a skilled guide who knows the local animals: which ones are bold, which are shy, and when it’s safe to approach. When you combine knowledge, patience, and a bit of luck, that’s when magic happens. The kind of once-in-a-lifetime image that stops people mid-scroll.
And finally—have fun. Stay safe. Don’t be afraid to fail (because, trust me, you will… a lot). The hit rate for this kind of photography is low. You might come home with 99 near-misses before you get the one. But when you do, it’s pure gold. Wide-angle wildlife photography is high-risk, high-reward, and absolutely worth it for those willing to push the boundaries. After all, if you’re not a little nervous, you’re probably not trying something new.


Beyond Animal Portraits: Elevate Your Wildlife Photography by Leighton Lum
Whether you're off to some distant corner of the globe or clicking closer to home, small shifts in your approach to wildlife photography can unlock new levels of creativity and impact.
Whether you're off to some distant corner of the globe or clicking closer to home, small shifts in your approach to wildlife photography can unlock new levels of creativity and impact. Here are a few of my favorite insights - earned through countless hours in the field - to deepen your connection with wildlife and transform your photos into visual stories that go beyond mere documentation.
Let Light Be the Story - Great wildlife photography isn’t always about the wildlife. Sometimes the critters play second fiddle to light itself. Photo • graphy, after all, literally means ‘to write with light.’ Sun rays piercing storm clouds, golden reflections off wet feathers, or the dramatic interplay of light and shadow created by backlighting - these fleeting conditions can transform an image from mundane to magical. Become a connoisseur of light and look for opportunities to make light the star attraction.

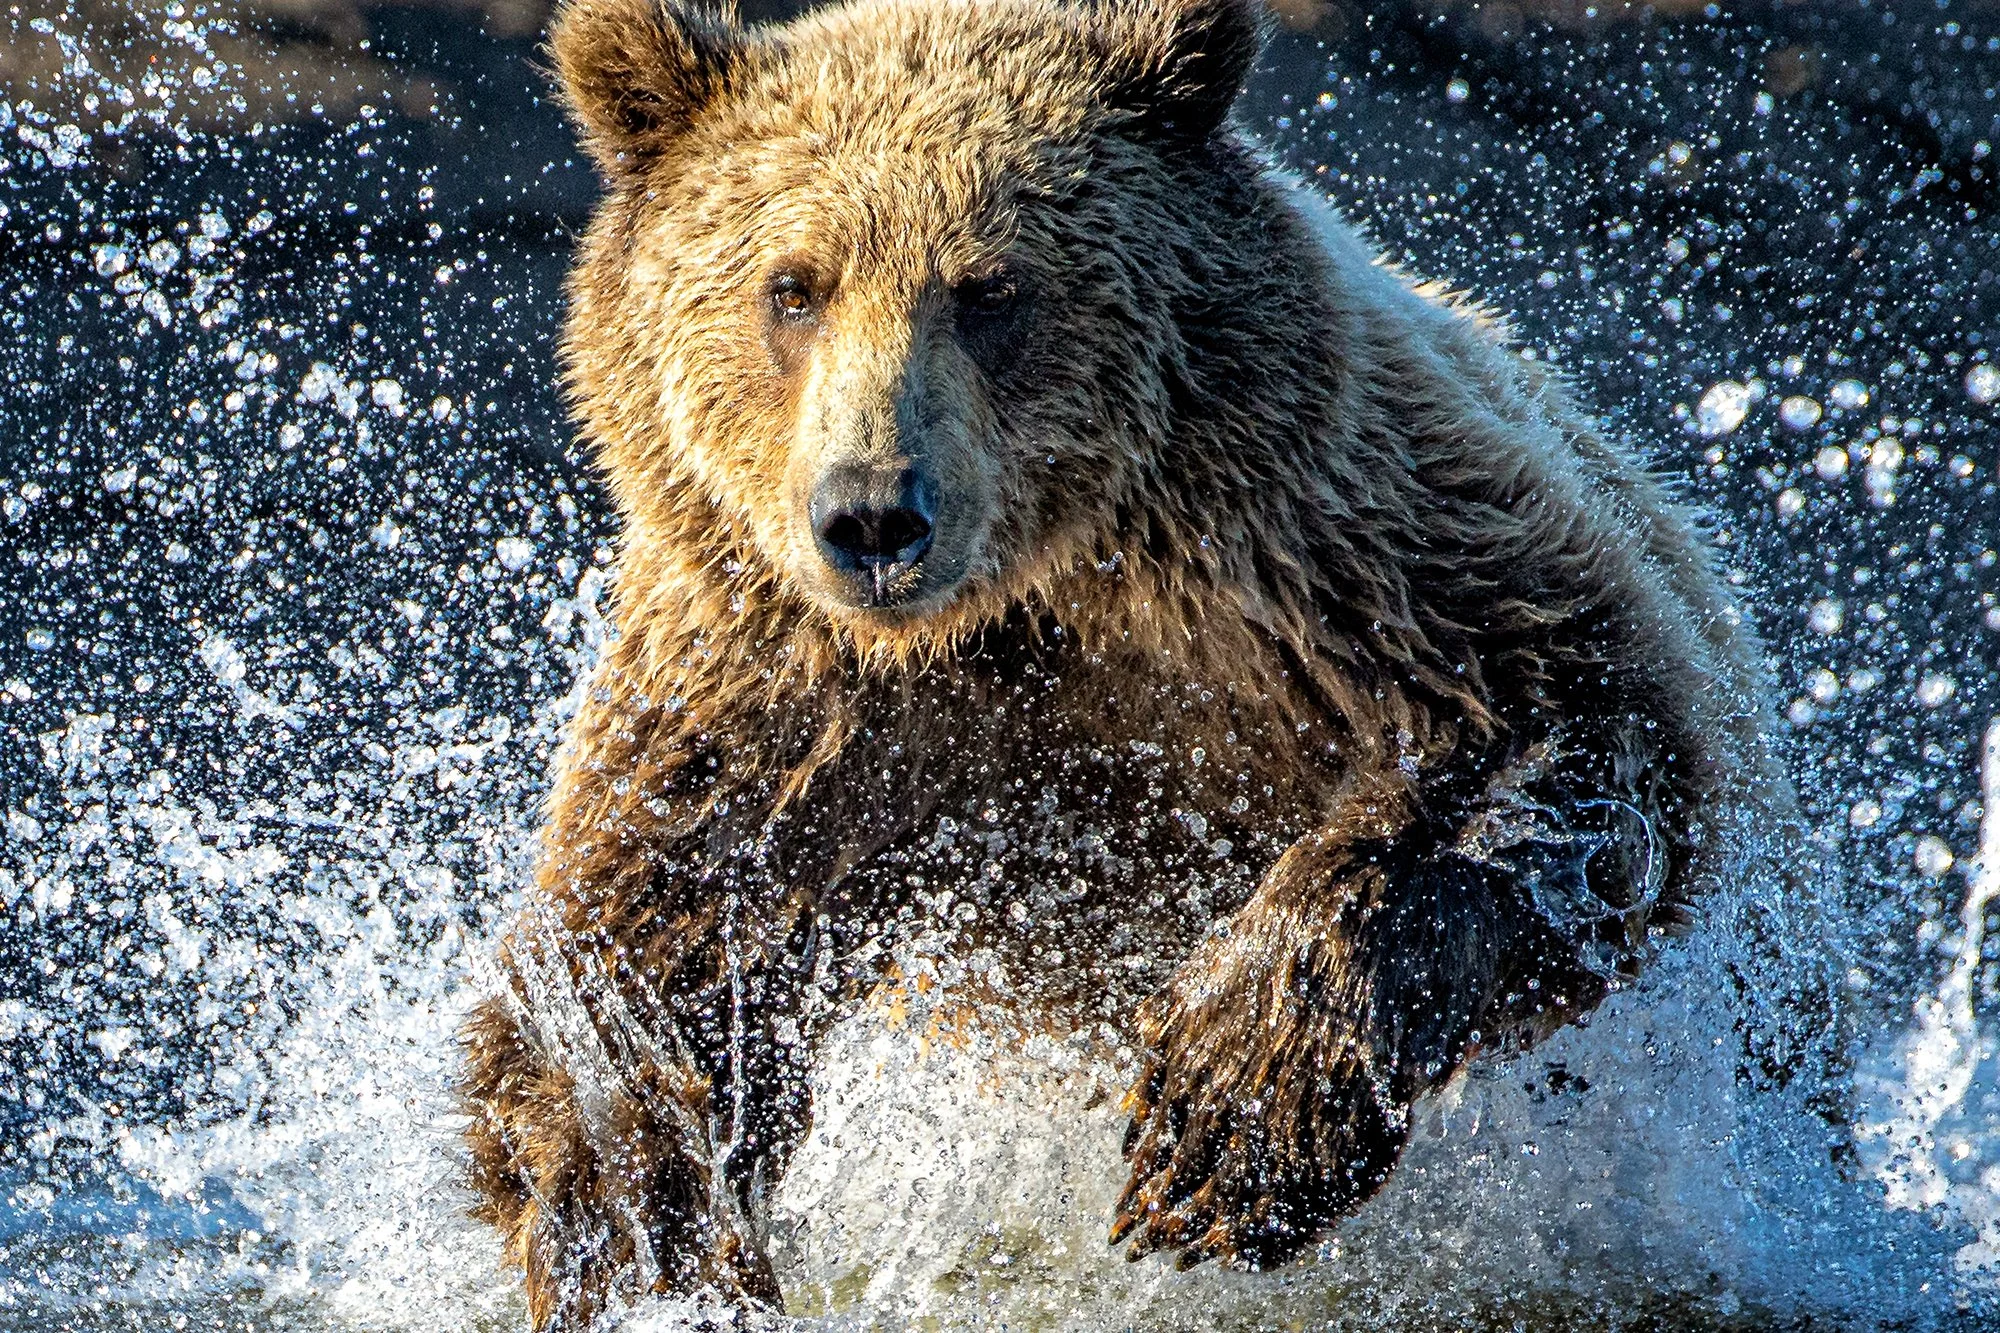
Understanding Animal Behavior – luck plays a role, but compelling wildlife images are more often a result of insight than chance. Recognizing subtle cues—a penguin about to preen, an albatross lifting into flight, a grizzly poised to lunge at a passing salmon—allows you to anticipate moments rather than react to them.
Embrace the Elements - rain, wind, cold, freezing sea spray - Nature often delivers less than comfortable conditions, but that’s where the drama lies. ‘Bad’ weather challenges both you and your gear, but it also gifts you with unforgettable images: penguins huddled in a storm, sea mist swirling over volcanic cliffs, animals enduring a rainstorm. For me, there’s nothing more depressing than a bluebird day. Nature never waits for perfect weather, and neither should you.
I hope these ideas have sparked new ways of thinking about your craft. The wild has so much to teach us—if we slow down, pay attention, and embrace the unpredictability. Let light guide you, let behavior reveal the story, and let the elements shape your vision. Most of all, get out there, put these ideas into action and make them your own. Wishing you bold adventures and beautiful light—happy shooting!

Regular Photography vs Low Angle Photography vs Low Wide-Angle Photography
We’ve previously written about the why’s and how’s of ‘going low’ when photographing wildlife, but let’s explore this idea even further...
We’ve previously written about the why’s and how’s of ‘going low’ when photographing wildlife, but let’s explore this idea even further.
Regular Photography

In this example, an uncluttered background and pleasantly out of focus background (i.e. ‘bokeh’) draws attention to the subject and helps separate it from its surroundings. Nothing wrong with this photo... but could it be better?
If the ground the animal you’re photographing is standing on happens to be visually interesting or exquisitely lit, there may be no need to change your perspective to capture a great wildlife image. But we’re usually not that lucky.
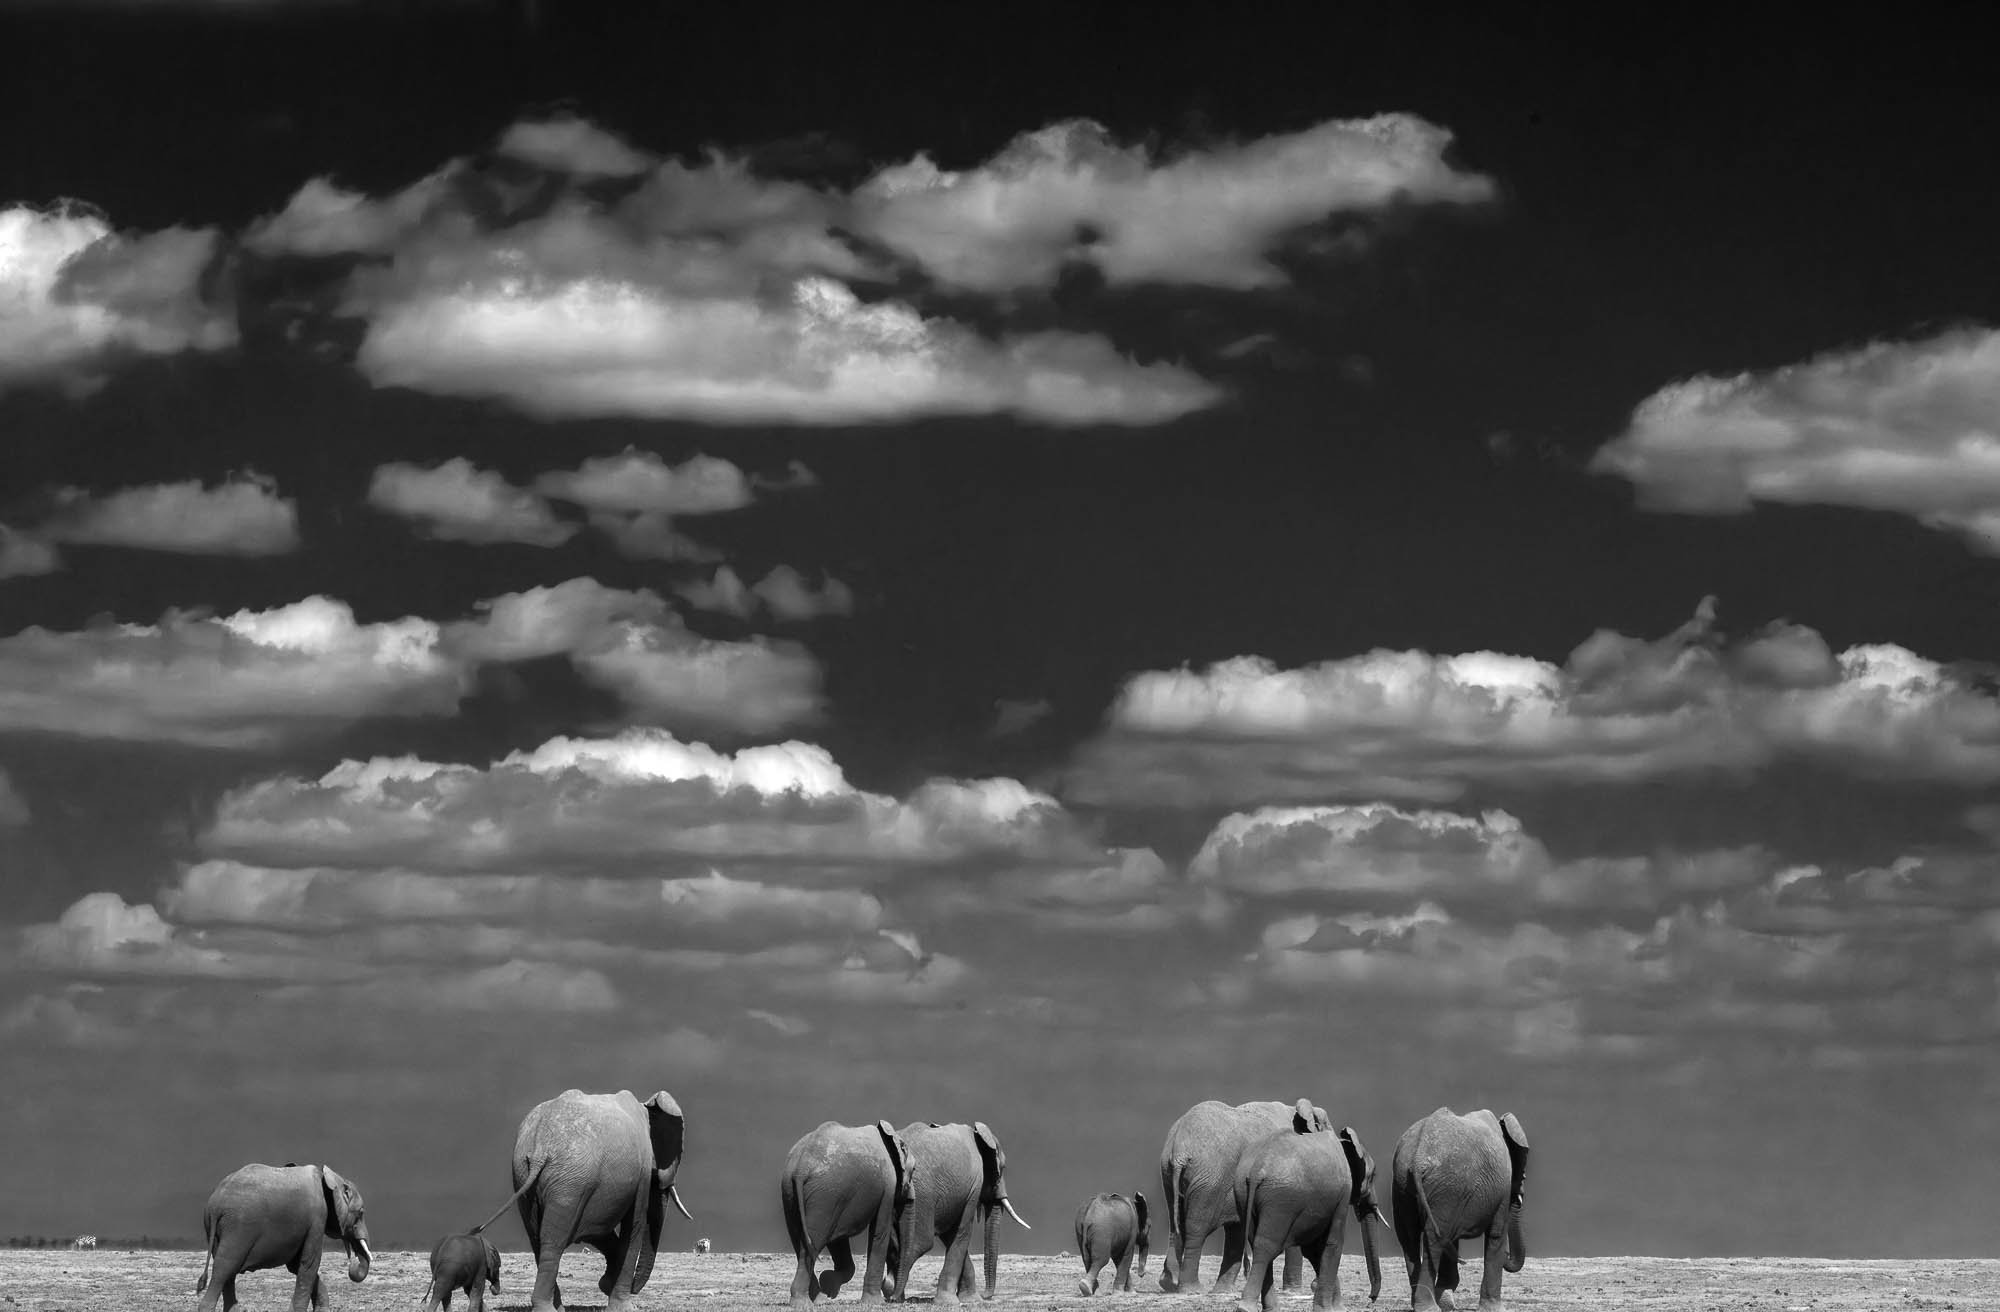
That’s the problem with ‘regular’ photography. By regular, I mean standing up, shooting from above photography. It’s hard to get anything but the ground behind the animal from this perspective and the ground is usually boring (monotone or just downright ugly dirt), busy or low-contrast relative to your subject - animals typically evolve to blend in, not stand out from their surroundings. Sure, you can zoom out to include sky and other landscape elements but if you look carefully, you’ll see that the horizon is above your subject so what’s actually behind the animal in the image is ground.
Low-Angle Photography


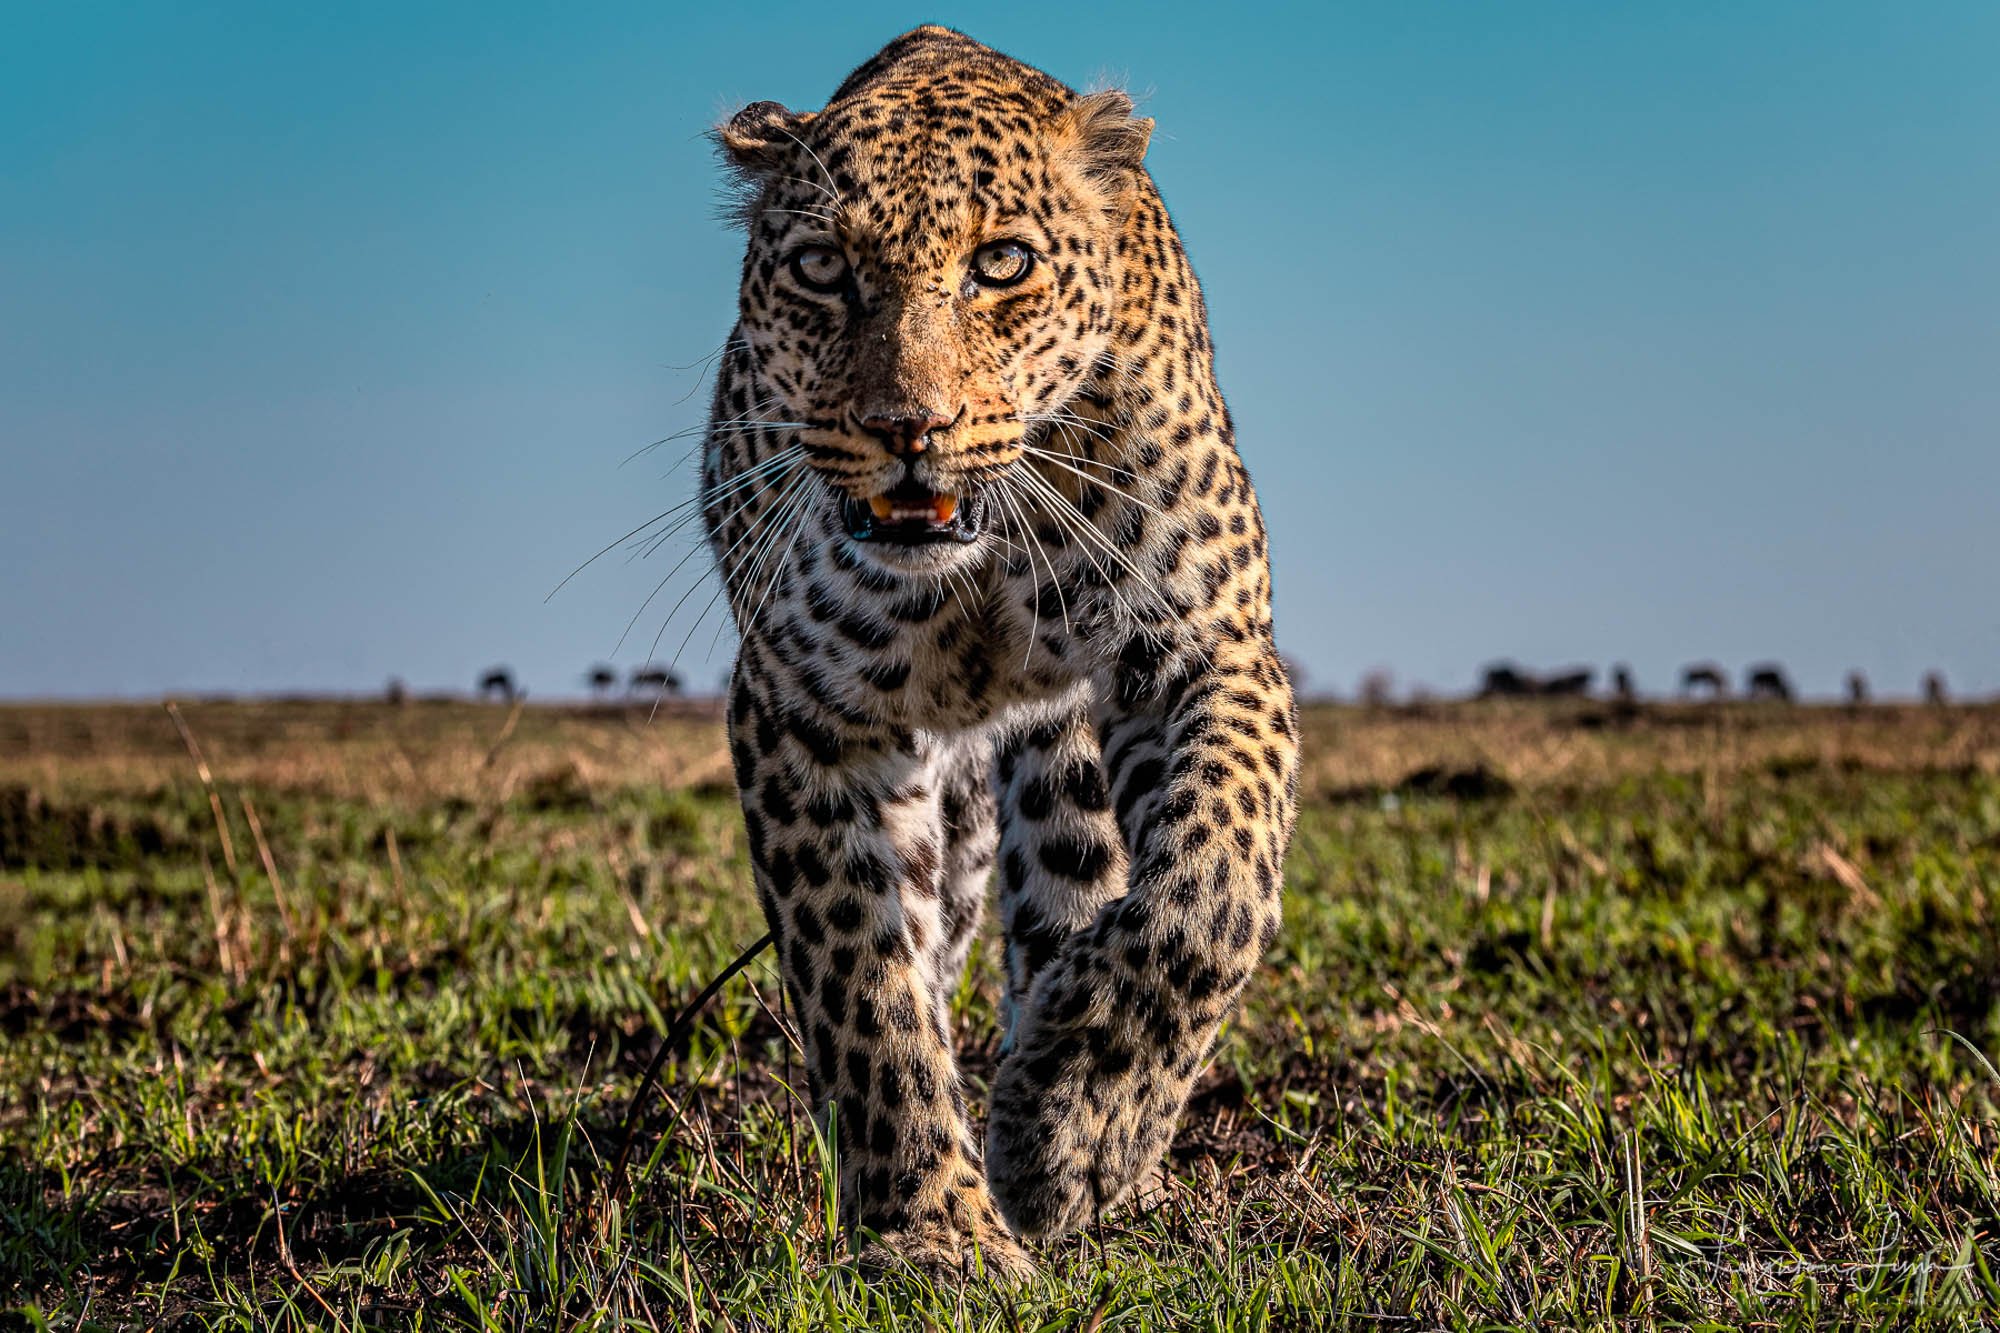
Lowering the camera allows you to have something other than the ground behind your subject. This can create separation/contrast or introduce elements that add variety and interest to your composition such as sky/clouds, trees, landscape features or just contrasting colors or tones. Direct eye contact, which often comes with being eye-level, can also make your photo more engaging by creating a stronger connection with the subject for the viewer.
Getting on your knees, or better yet, your belly, is the price to be paid but the results are usually well worth the little loss of dignity as you struggle back to your feet.
Low Wide-Angle Photography
The hardest but potentially most rewarding of the 3 options. This method of photography requires more pre-planning, a little more risk and a lot of luck. Chances of success are much lower, but the reward is a dramatic perspective with undeniable impact!
For this technique I typically put on my 15-35mm lens and try to position the camera in the path of my subject. Camera damage or loss is a real possibility. But when everything works, the images produced are often extremely impactful and quite different from your “average” photograph.


Trial and Error is key
A lot of failed attempts will occur before a successful shot.

Curious bear, but the camera is facing the wrong direction.

This bear fell asleep next to my camera. I waited for over an hour to retrieve it.

Success! Curious bear checking out my camera
You gotta risk it for the biscuit
Remember these are wild animals, and very powerful ones. Sometimes their curiosity can cause result in unfortunate consequences for your camera. You must decide if the rewards justify the risk – or at least find out if you’re insurance covers bear damage!


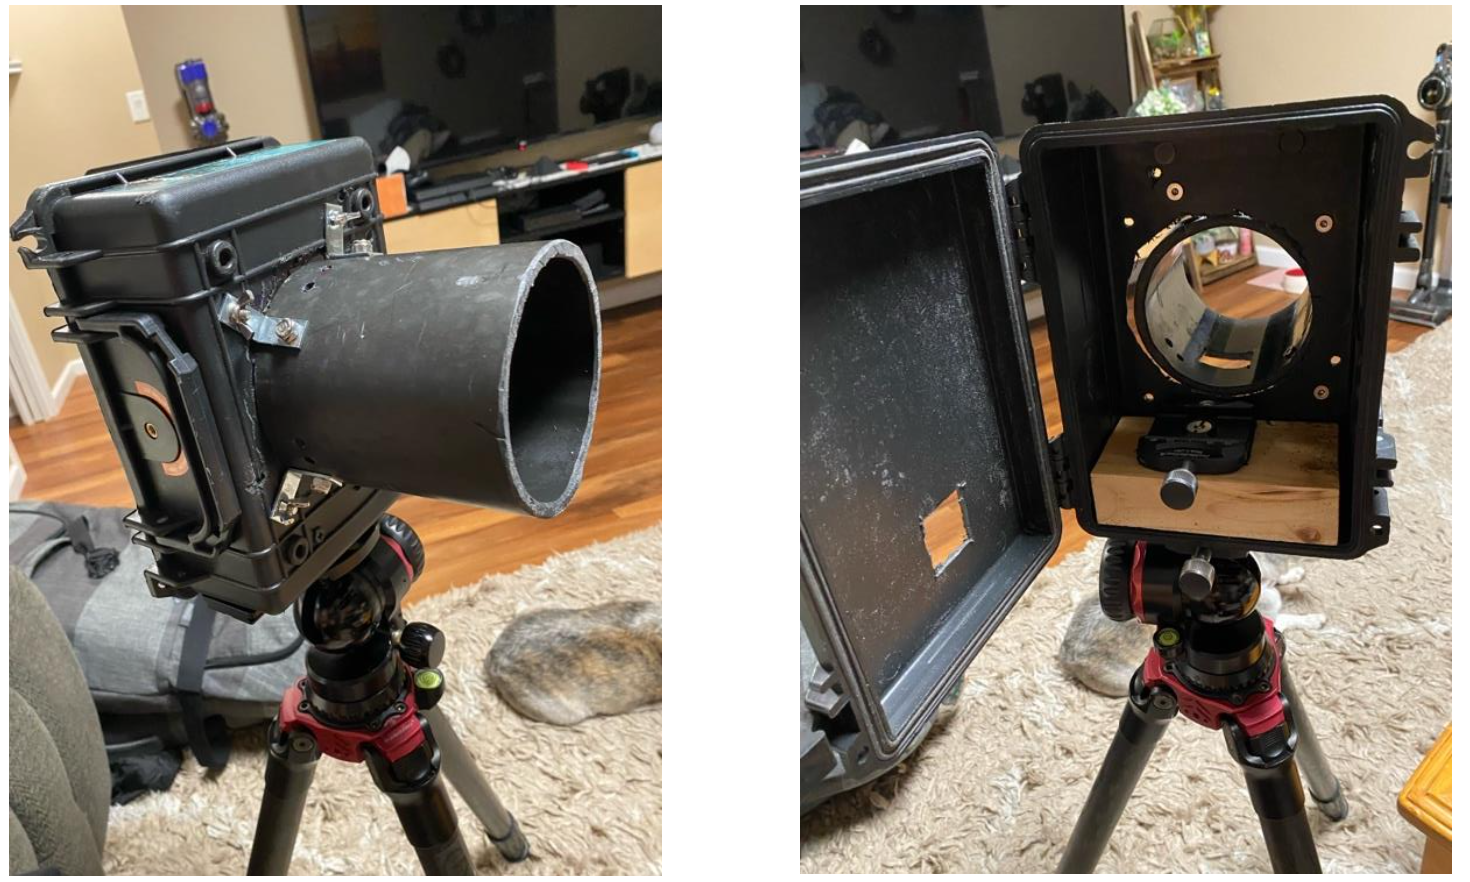
Protecting the camera. I made this contraption from a Harbor Freight “pelican” case and PVC...nothing fancy, but it works!
Keys to success with low wide-angle photography
Getting sharp focus on your subject’s eyes (not nose, ears, etc.) is always a challenge, but the ‘animal eye-focus’ capabilities of modern mirrorless cameras greatly increases your odds of success. It’s not 100% accurate, but produces more hits than misses. Even so, this type of photography requires a lot of patience and repetition.
You need a way to trigger the camera from a safe distance, especially when working with animals that are potentially dangerous. I personally use the Camtraptions trigger, but there are lots of options. One weakness of most trigger systems is the short wire connecting the receiver to the camera is easily damaged so it’s a good idea to carry a spare.
Observe animal behavior – knowing the typical behavior or habits of an individual will help you better you place the camera. With bears, some individuals are more curious or calmer than others. Some bears are more skittish and won’t go anywhere near the camera. Your guide is also a great resource as they’ve spent countless hours with these animals and know their typical behaviors and individual characteristics.
Keep trying - determination and repetition is the formula for success. You may not get it on the first try or the second but eventually one shot will work out! Knowing how difficult it is to get a shot like this makes getting the shot that much more rewarding.
Good luck and happy shooting!

Getting Down in Africa – Low Angle Photography Why & How
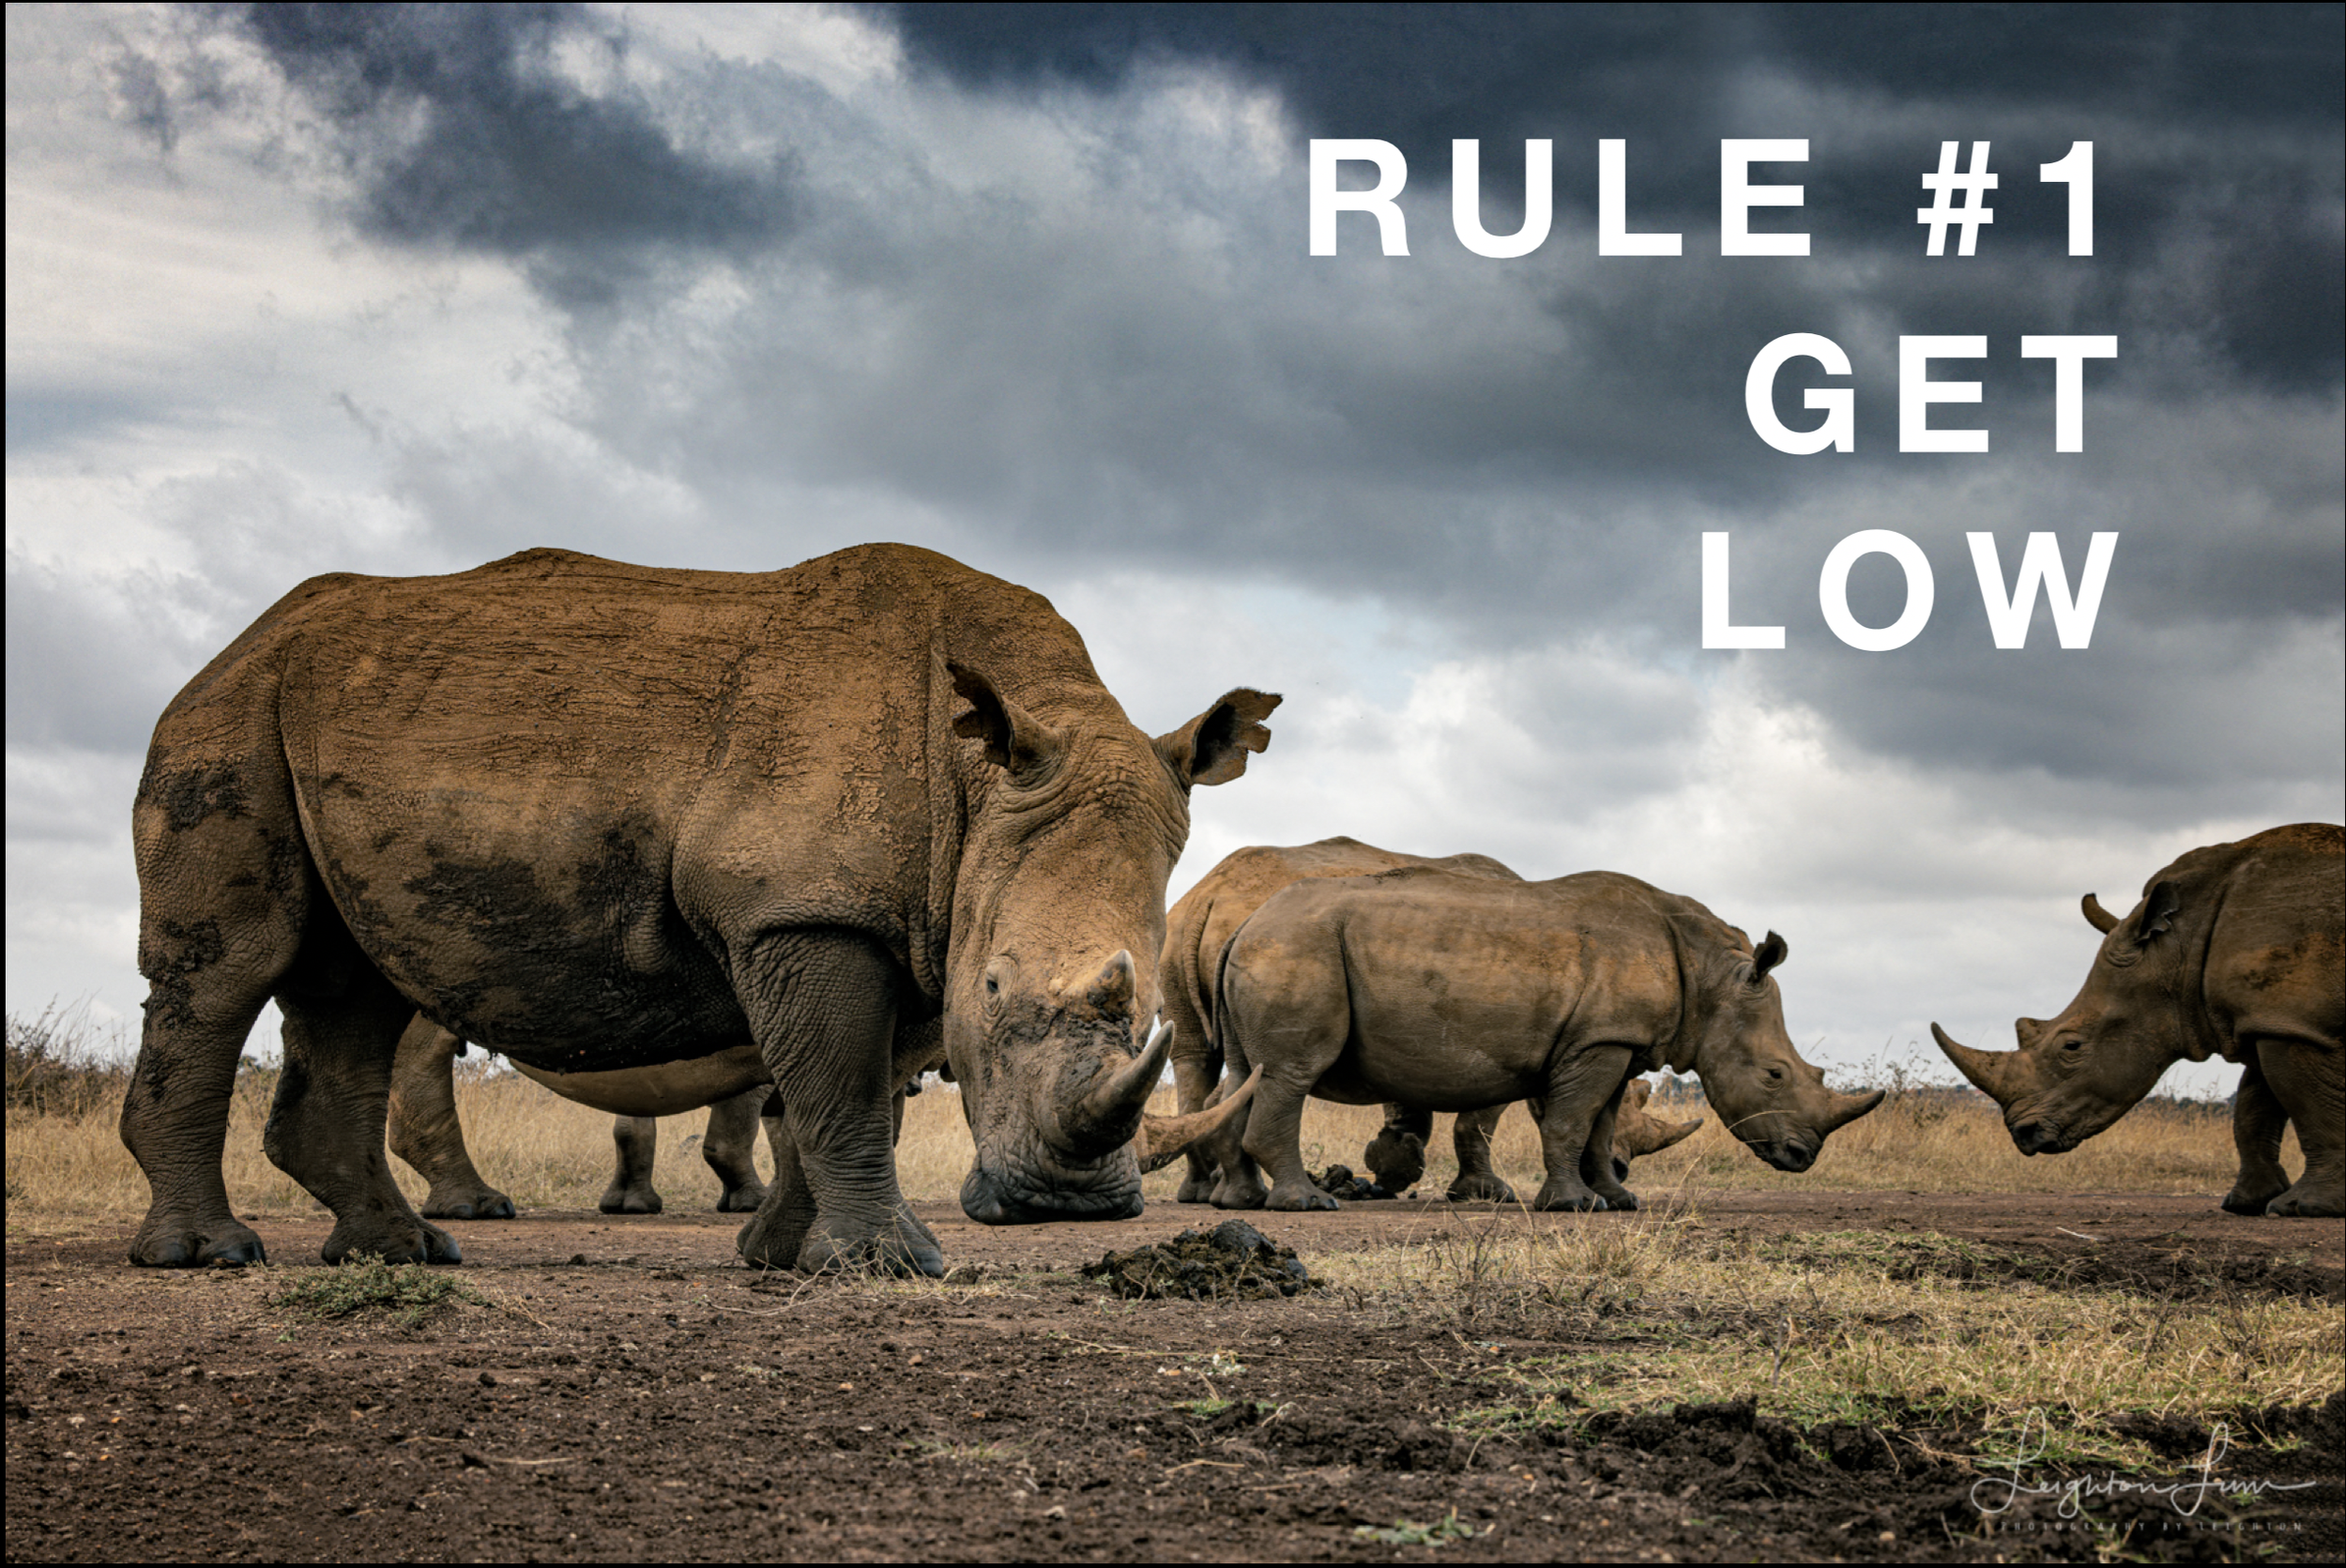
Rule #1 of wildlife photography is Get Low. But why? And how do you even get low when you’re confined to the inside of a safari vehicle as is almost always the case in Africa?

Rule #1 of wildlife photography is Get Low. But why? And how do you even get low when you’re confined to the inside of a safari vehicle as is almost always the case in Africa?
Why Go Low?
The change in perspective that comes with a low camera angle (subject eye level or below) can be helpful in many ways:
Eliminate busy, boring or low-contrast backgrounds - when photographing animals from above, it’s hard to end up with anything other than the ground as a background. While that’s not necessarily a bad thing if the landscape or light is interesting, shooting from near ground level gives you options, like having sky behind your subject. Predators and prey are also naturally evolved to blend into the landscape which is great for survival but not always helpful for pictures.
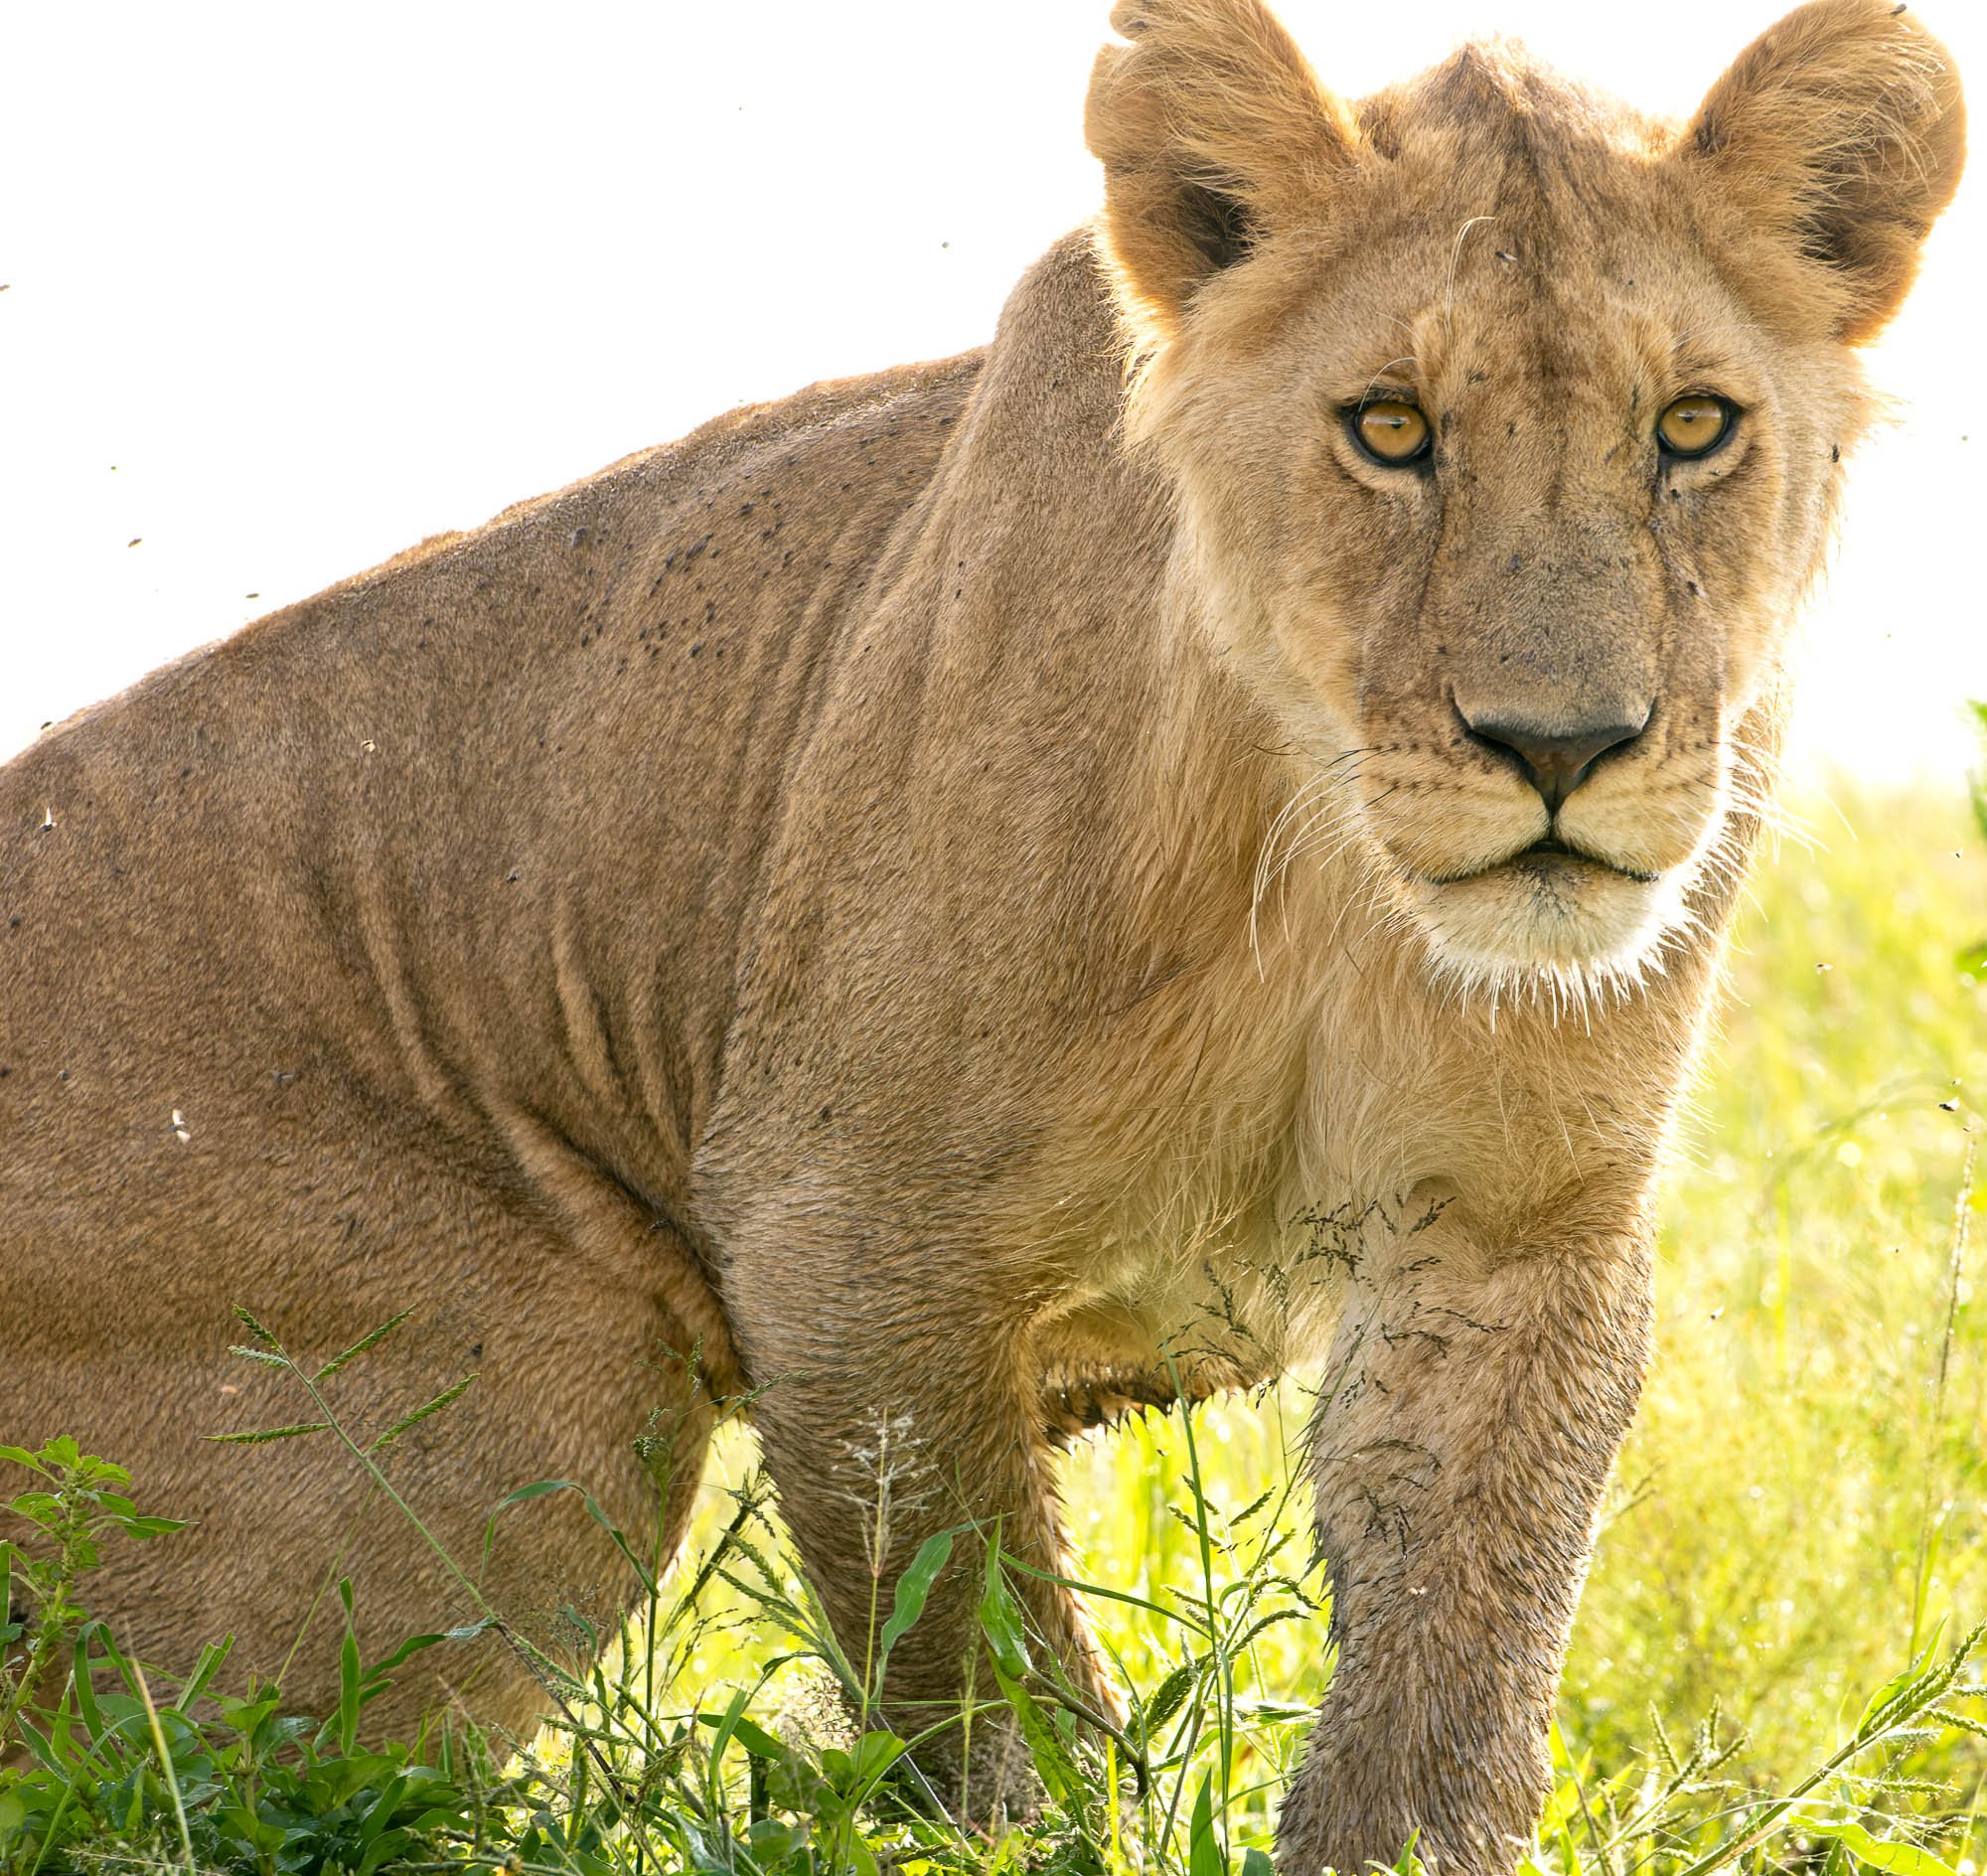
Create connection – direct eye contact creates a powerful connection with your subject but it’s harder to achieve from above - parts of the eye are often obscured by the shadow cast from the eyelid or brow. A low angle helps you clearly see the subject’s pupil and iris. The result is a subtle but noticeable increase in impact.
Something different - a very low perspective also adds interest simply because it’s novel – it’s not the usual way we view animals. It also increases your subject’s ‘gravitas’. If you want an animal (or person) to look bigger or more imposing, shoot from below.
Show me, don’t tell me

It’s easier to show than explain, so take a look at the example images in this post and linked gallery – hopefully the difference and benefits will be obvious.
Getting Down
Now that we understand some of the benefits of a low camera angle, it’s time to move on to how to accomplish it. My friend and often co-workshop leader, Leighton Lum, introduced me to his Low Angle Monopod method during my first trip to Africa and it’s responsible for some of my favorite images.
DISCLAIMER: Use this technique at your own risk! It involves sticking parts of your body outside the safety of the safari vehicle – don’t get so absorbed in taking pictures that you lose situational awareness. If a curious lion approaches too close, get all of yourself inside the vehicle immediately even if it means leaving your equipment outside temporarily.
Equipment – The Basic Rig
Camera –it’s possible to make this technique work with a dSLR, but a mirrorless body, especially one with an articulating screen and Animal Eye Focus capabilities are really what you want.
Lens – a medium telephoto like a 70-200 mm is our recommendation. A rotating collar mount is especially helpful so you can orient your camera right side up
Monopod– nothing too special here, most models will work but something lightweight will help minimize arm fatigue. A ball head is optional but keep it lightweight as well.
Remote Release or Camera App – you’ll need a way to trigger your shutter. Every camera manufacturer makes a wireless remote release for their cameras and there are plenty of third-party options as well, all relatively inexpensive. I really like these remotes by JJC for Nikon, Canon & Sony because they work via Bluetooth, eliminating the need for a receiver/connecting cable (requires a camera w/Bluetooth capability). Your camera manufacturer’s mobile app can also serve as your remote release but we’ve seen mixed results – sometimes there’s a slight delay between pressing the button in the app and the actual camera shutter click.
The Technique
Establish a connection between remote release and camera following the instructions of your remote release hardware or app.
If using a ‘traditional’ remote release, mount the receiver in the camera’s hot shoe and connect the cable from the receiver to the appropriate port on the camera.
If using Bluetooth remote or camera app, create a wireless connection between the remote trigger and the camera according to instructions provided
Set Autofocus – Enable Animal Eye Focus and use it conjunction with the Wide/Large area or Full Screen option in AF area setting if possible.
Rotate Lens Collar – so that the mount foot is facing up and attach monopod
Tilt your LCD screen up so it’s facing up and viewable from above
Test – make sure everything (camera and remote release or app) is turned on and give it a try. Make sure you can activate autofocus and fire the shutter using your remote release or app. Practice passing the rig through a vehicle window, lowering the camera, finding and focusing on your subject, and firing the shutter. Adjust your zoom as necessary and leave plenty of room to crop and straighten crooked horizons.
Be patient and keep practicing. It’s normal to feel clumsy at first and your results may be less than stellar. This will improve with practice.
Note: if you use Back Button focus and have disabled Shutter button AF activation, you may need to re-enable it
Randall's rig
Options & Finer Points
Look, listen to your eyes – the low angle technique is a great arrow to have in your quiver but it’s not always the right choice for every image.
Switching between low angle and regular shooting is time consuming. If possible, it’s nice to dedicate a second body to low angle shooting.
The cable connecting your remote receiver to the camera is easily damaged. Carry a spare and be careful not to pinch or stress the cable connections.
In bright daylight the monitor can be hard to see. An LCD shade might help, but also keep in mind it’s not necessary to see every detail - you’re relying on the camera’s AF to achieve focus and seeing less detail is often helpful for composition.
Next level – Randall Ball’s new and improved version of the low angle rig. We’ll save the details for another post but leave it to a Cajun to take things up a notch.
Have fun, be safe, good luck!

The G.O.A.T.
Our 2018 Scouting Mission to Ladakh (Indian Himalayas) was the epitome of epic adventure travel. Every day, we said it couldn’t get better. Every day it did. Tears ran down cheeks on the final night, as we stood on the roof of a thousand-year-old monastery photographing the Milky Way with the rumbling soundtrack of throat-chanting Tibetan monks.

A monk calls his brothers to Morning Prayer
“My favorite trip of all-time? It’s a question I’m asked often. I usually give some wishy-washy answer because it feels like I’m being asked to choose a favorite child. But it’s always Ladakh that comes to mind, all due respect to my other “children” - I love you all. ”

Our 2018 Scouting Mission was the epitome of epic adventure travel. Every day, we said it couldn’t get better. Every day it did. Tears ran down cheeks on the final night, standing on the roof of a thousand-year-old monastery photographing the Milky Way with the rumbling soundtrack of throat-chanting Tibetan monks.
Little things like a pandemic have kept me from returning, but I’m finally going back in April 2024. Come with me and let me show you why Ladakh is my Greatest Of All Time!
What & Where is Ladakh?
Ladakh is a mountainous region in far northern India bordering Tibet. The Himalaya mountain range dominates much of Ladakh’s territory. The history, people, and culture here are more closely associated with Tibetan Buddhism than the rest of Hindu-dominated India. Indians often describe Ladakh as, “Heaven on Earth.”
What’s it Like in Ladakh?
Wild, Remote. Other-worldly. That’s how my first visit to Ladakh felt. The biggest mountains in the world make for some truly grand landscapes. Vast spaces, really vast and starry skies that make you feel really small. Monks and nomads living lives from another time. There are not many places like this left. I wonder how it will feel when I return. I wonder what I missed the first time. I wonder what’s changed.
Show Me, Don’t Tell Me
I get it, we’re photographers, shut up and show me the pictures. Here you go: Ladakh Photo Gallery


2024 Trip info
Want to See and experience this magical land for yourself? Click here for full details about our April 2024 Ladakh Himalayan Adventure photography workshop

The Classic
2+ hours of steady pre-dawn uphill hiking by the light of our headlamps. An in-the-dark puma (mountain lion) encounter on the trail that elevated our heartbeats yet another notch. Hunkering down in the boulders against the whipping wind, wearing every stitch we had, fumbling with camera controls and tripods waiting for first light. I'll cherish these memories more than any resulting photographs.

Iconic - first Light on Mt. Fitzroy
2+ hours of steady pre-dawn uphill hiking by the light of our headlamps. An in-the-dark puma (mountain lion) encounter on the trail that elevated our heartbeats yet another notch. Hunkering down in the boulders against the whipping wind, wearing every stitch we had, fumbling with camera controls and tripods waiting for first light. I'll cherish these memories more than any resulting photographs.

Not the actual cat we encountered, but pretty much what we saw (image from my neighbor’s trail cam).
Secret Falls is hardly a secret anymore. This oft-repeated image of the falls with early light on Mt. Ftizroy has become 'the shot' for many photographers to bag on the Argentina portion of their Patagonia tour. It's a classic for a reason, but for me, there’s little joy in recreating any famous shot…it just doesn’t feel creative.
But the journey, the adventure of getting there, especially this time…that’s a different story. Someone once told me, “photography gives us an excuse to do crazy things.” I thought about that as we descended, pausing repeatedly to allow throngs of more sane, post-breakfast uphill hikers to pass. More crazy, please.
Photo Tip: Look at Small Images to See the Big Picture
Sometimes looking at a very small image often helps you better see the overall composition of a photograph. Read my blog to learn more.
I got a new camera recently that has a beautiful large high resolution LCD screen for previewing images. I see much more detail in this new display than the one in my old camera, but in some ways I miss the "postage stamp" size screen of my previous system. That's because looking at a small image often helps you better see the overall composition of a photograph. Since you can't see much detail, what you are left with is the overall 'shape' of the picture. What I mean is that the pattern of highlights & shadows, dominant colors, and shapes becomes much more obvious when you look at smaller versions of images. You can use this fact to fine tune your compositions in the field. Simply shoot one frame and bring up the image on your camera's screen (this works best when using a tripod). Now try to evaluate the composition from a global perspective. Trust your first impressions. Does the composition feel balanced? Is there a clear subject or does it get lost against the background? Are there any unintentionally distracting bright areas in the frame? If you are having a hard time seeing the overall composition, try stepping back from the screen or bring up the histogram display which further shrinks the size of your image on screen.
Looking at small images is also particularly useful when you are trying to select your best images from a photoshoot. When I was shooting film, I would scan the slide pages on a lightbox before breaking out the loupe. Now that most of us have gone digital, I suggest using your software to view your images as 'thumbnails' during the initial edits.
The pictures that jump out at you at this size will almost always be your strongest compositions. You can also use a variation of this technique when you are working on individual images. It's easy to lose the forest for the trees after spending some time burning, dodging, color correcting and making contrast adjustments. To regain perspective, try shrinking the image on screen and stepping away from the monitor. Better yet, take a break and leave the room. When you return, quickly glance at the screen. Your initial impression will give you a good idea if you are on the right path or if you took a wrong turn somewhere.
Best of Nature
Two of my images, "Winter Fenceline" and "Humphrey's Basin at Dusk" were chosen to be included in theBest of Nature exhibition at the San Diego Natural History Museum. A total of 72 images were selected from over 2300 entries for this exhibit.
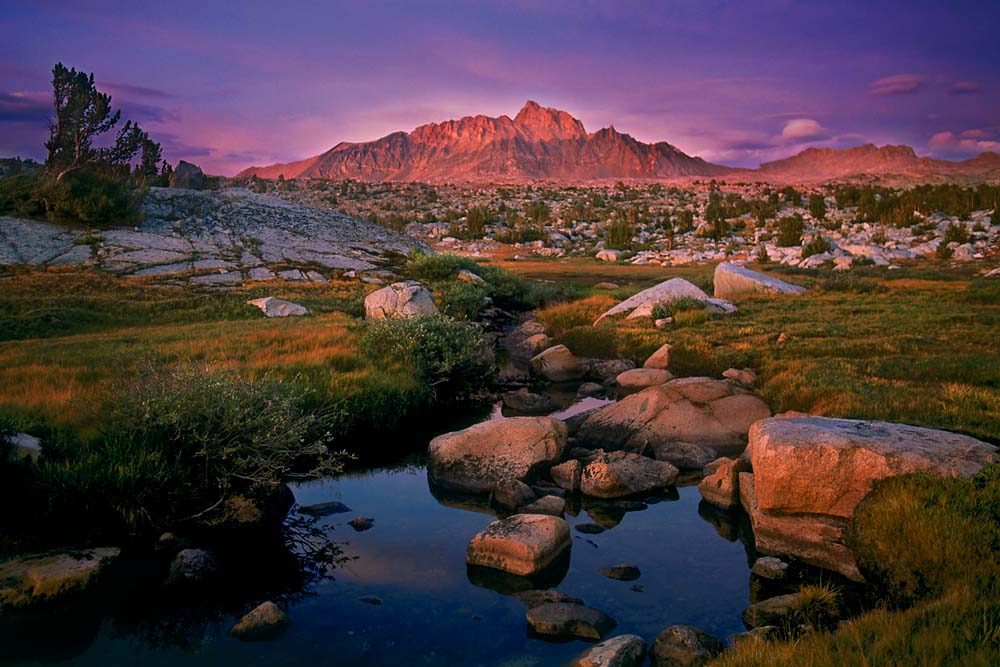
Humphrey's Basin at Dusk

Winter Fenceline
Two of my images, "Winter Fenceline" and "Humphrey's Basin at Dusk" were chosen to be included in theBest of Nature exhibition at the San Diego Natural History Museum. A total of 72 images were selected from over 2300 entries for this exhibit. The exhibit will be on display at the museum from June 27th thru Sept 13 this year. Click here for more information.
Photo Tip: Zoom in for Stronger Compositions
Everyone has experienced the disappointment of photos that just don't do justice to the beauty and drama of the scene they remember. Usually, this gets blamed on not having a good enough camera. More times than not, however, the culprit is a composition that lacks focus.
Everyone has experienced the disappointment of photos that just don't do justice to the beauty and drama of the scene they remember. Usually, this gets blamed on not having a good enough camera. More times than not, however, the culprit is a composition that lacks focus. Not blurry/sharp focus, but focus in terms of having a clear subject. Faced with photographing a beautiful scene, most people automatically try to "get it all in" one picture. This usually means physically backing up or zooming out with the lens. And when they run out of room, people lean back to try to get that extra tree, mountain, river, whatever in the shot. Unfortunately, in most cases, this is exactly the opposite of what you should be doing. The next time you you find yourself backing up, ask yourself, "what is the subject of this picture?" "What is the really interesting thing about this scene and what can I leave out?" Keep moving forward or zooming in, eliminating (cropping out) everything that is not essential to your composition. Then check all the edges and corners of your frame and see if you can crop out anything else. If you can't resist, shoot one frame with a 'loose' composition and another with the tighter composition. I'll bet you'll agree that the tighter composition almost always makes the stronger image.