

Insights and musings about photography and the creative process

How Blue Balls Helped Me See the Light
Sadly, my alma mater, the Brooks Institute of Photography, is no more. But while it existed, it was one of the premier institutions of photography education, and a few foundational assignments at Brooks achieved legendary status among the student body: The Grey Box. Black Glass. The Mission Shot. Each is deceptively simple at first glance, yet fiendishly designed to expose the slightest flaw in your understanding or execution of the knowledge they were meant to impart.

The infamous Brooks Institute Blue Balls
Sadly, my alma mater, the Brooks Institute of Photography, is no more. But while it existed, it was among the premier institutions of photography education. A few foundational assignments at Brooks achieved legendary status among the student body: The Grey Box. Black Glass. The Mission Shot. Each deceptively simple at first glance yet fiendishly designed to expose the slightest flaw in your understanding or execution.
One I’ll never forget—both because of what I learned and its title—was "The Blue Balls". Brooks instructors were crafty, but they also had a sense of humor.
Decades have blurred the details, but the core memory remains clear: carrying around a contraption made of a racquetball and a shiny blue Christmas ornament, mounted on rods and connected by a piece of 2x4.
Our task was to photograph this rig under various lighting conditions: full sun, cloudy days, open shade, window light, etc. Afterwards, we recorded our observations in another Brooks icon, the Comp book, describing in painful detail the qualities of the highlights, shadows and transitions.
Both balls were blue, hence the name, but their color had nothing to do with the point of the assignment. This odd rig was a lesson in paying attention. Admittedly, I didn’t appreciate the value of the exercise at the time – ok, my classmates and I thought it was Dumb with a capital D. But hindsight – as it so often does – has enlightened my perspective. Paying attention taught me to see beyond light and dark and notice the nuances of texture, transitions and mood.


Blue balls in Sunlight, Shade, Window Light & Cloudy lighting. Photos: © Google Gemini?
Becoming a Connoisseur of Light
The more you study a subject, the more you become aware of its subtleties.
The average imbiber’s ‘tastes good’ is probably quite different than a sommelier’s experience of the tannins and terroir in a sip of fine wine. I’m no birder, but learning a few bird-watching basics expanded the world of ‘little brown birds’ to a universe of sparrows, juncos, and chickadees. Dentists can’t help noticing coffee-stained teeth and receding gums.
What’s your area of expertise? What do you see that a layperson never notices?
It’s the same with light – the more you observe, the more you pay attention, the more you see.
Brave New World
It’s embarrassing how long I’ve been meaning to write this article. So many distractions, so many excuses. So many hours searching for the exact shade of blue ornament of my memories. Procrastination is a wonderful thing! 🙄
But this time would be different. A trip to Home Depot for grey paint and dowels. Racquetballs and ornaments from Amazon. The writing would begin as soon as I built and photographed that Blue Balls contraption!
But then a sickening thought materialized: It's December...in western Washington – when would I see the next sunny day? Weeks, months? My grand publishing plans were evaporating like steam from a mug of Seattle coffee.
Suddenly, another thougt: What about AI?
All of the Blue Balls images in this article were generated by Google Gemini (techinically, Nano Banana) from a description I typed. What do you think? Did you suspect? Now that you know, can you tell?
Obviously, I think the AI “photographs” are usable for my purposes. The initial image Gemini produced is pretty much the exact picture I envisioned. But what really impressed me were the variations it came up with based on the different lighting conditions I described. There's no doubt Gemini understands the properties of light and how it reacts with different surfaces.
It made me think, is AI the ultimate tool for learning or teaching photography?
Is AI good or bad for photography, for humanity? A dream or a nightmare? These are questions for another time and a higher pay grade.
All I know is AI is here and we’re living in a Brave New World.
The Lexicon of Light
Learning the language and terminology of the subject you’re studying is always helpful.
Eye-line, rufous, and malar weren’t in my vocabulary before I started paying attention to birds but knowing these words helps me quickly distinguish similar species.
When it comes to light, some words photographers should be familiar with include:
Specular – hard light, the sun on a blue-sky day. It creates bright highlights, dark shadows, and sharp transitions. Models look good in hard light; soft light is more flattering for mere mortals. Grand landscapes in hard light rarely inspire, they just make you want to squint.
Specular can also refer to the shiny surface quality of things like the Christmas ornament, cars, jewelry, or a still mountain lake. The key to photographing specular objects is understanding you’re really photographing the reflection. That's why your car looks amazing after a wash—you're really admiring how well it reflects the world around it.
Diffuse – soft light, cloudy days or shade. Diffuse lighting results in less contrast, softer transitions. Window light is considered diffuse as long as the sun isn’t streaming directly through it. It’s a portrait photographer's secret weapon and why we see so many Instagram shots by the café window.
Ready to take off the training wheels? Seeing the subtleties of Contrast & Color is where even experienced photographers often struggle, especially when it comes to post processing their images. My fellow Brookies & I were ‘blessed’ with merciless instructors and endless repetition. But we lacked the benefit of YouTube and the instant feedback of digital photography. You don’t need a formal education in photography to learn these lessons. But you do need to pay attention…and practice.
Your Teacher Awaits
Lessons From Your Kitchen Blender
I’d love for you to join us on one our photography adventures, but the truth is you don’t need to go anywhere to learn about light. After all, light is everywhere. You don’t even need a camera. You just need to pay attention.
I can’t help noticing whether its finches or towhees visiting our feeder nor the way the light falls on the face of the person I’m talking to nor the choices the cinematographer made in the movie I’m watching.
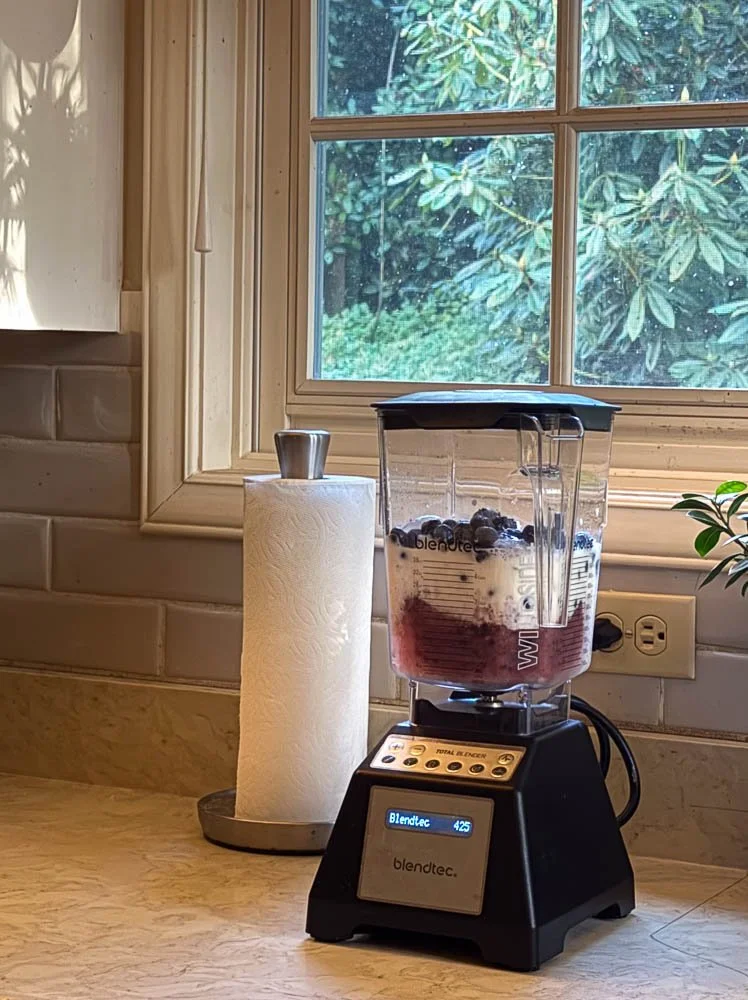
You might notice the beautiful way the early light illuminates the blender you use to make your morning smoothie.
Will noticing make you a better photographer? I think so, but what I can promise is that noticing light will make your life experience richer. It’s what I call the Gift of Seeing. But that’s another topic for another time.
So start small. Take a moment to notice the light in your kitchen (or bedroom or backyard) tomorrow morning. That's your Blue Balls assignment.
Try it, you’ll See. 😉

Beyond Animal Portraits: Elevate Your Wildlife Photography by Leighton Lum
Whether you're off to some distant corner of the globe or clicking closer to home, small shifts in your approach to wildlife photography can unlock new levels of creativity and impact.
Whether you're off to some distant corner of the globe or clicking closer to home, small shifts in your approach to wildlife photography can unlock new levels of creativity and impact. Here are a few of my favorite insights - earned through countless hours in the field - to deepen your connection with wildlife and transform your photos into visual stories that go beyond mere documentation.
Let Light Be the Story - Great wildlife photography isn’t always about the wildlife. Sometimes the critters play second fiddle to light itself. Photo • graphy, after all, literally means ‘to write with light.’ Sun rays piercing storm clouds, golden reflections off wet feathers, or the dramatic interplay of light and shadow created by backlighting - these fleeting conditions can transform an image from mundane to magical. Become a connoisseur of light and look for opportunities to make light the star attraction.

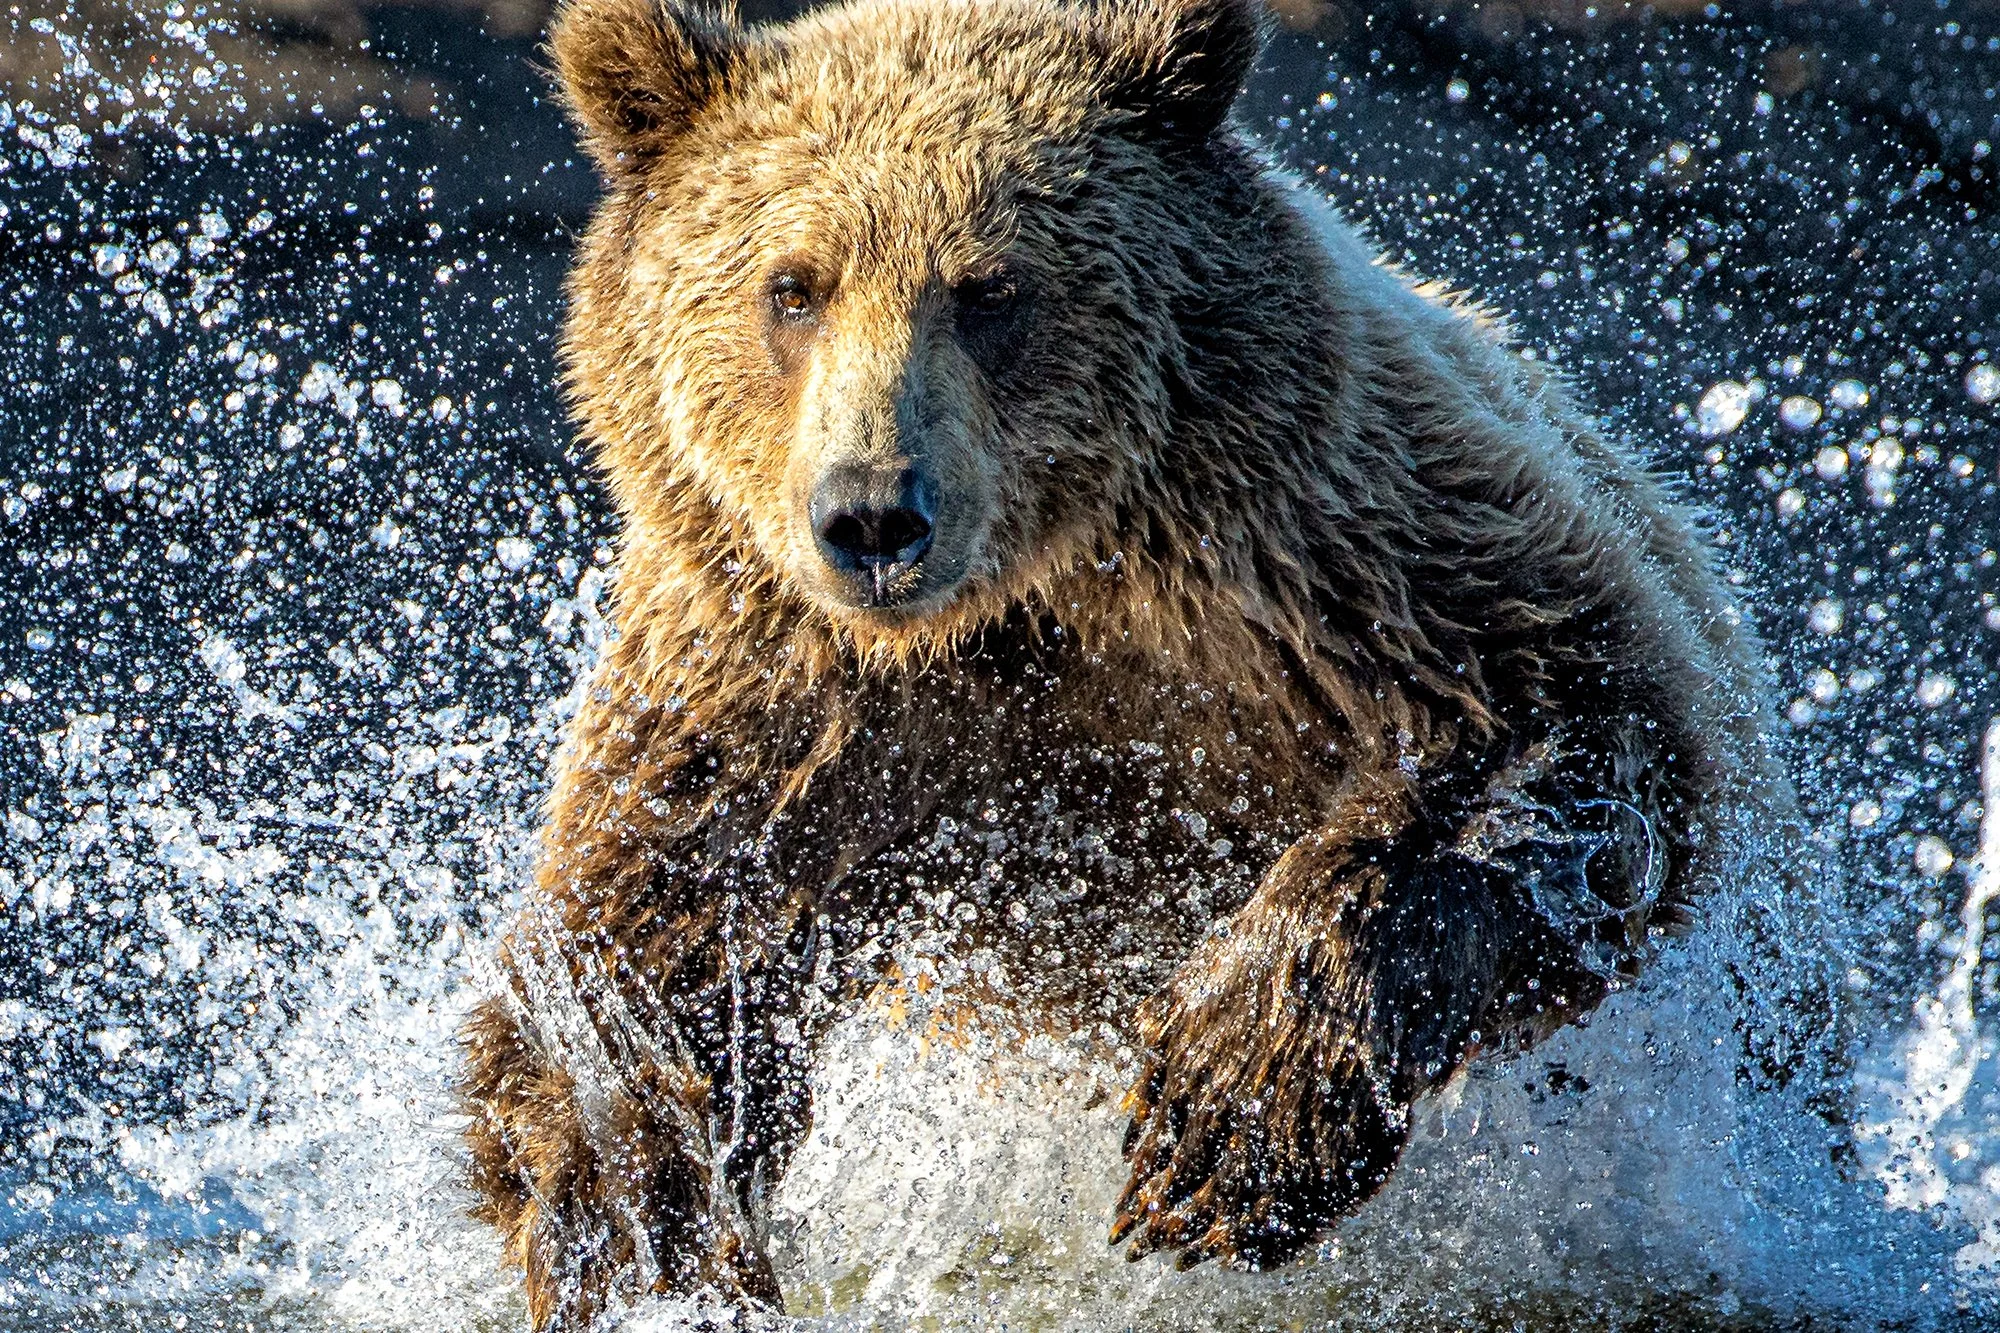
Understanding Animal Behavior – luck plays a role, but compelling wildlife images are more often a result of insight than chance. Recognizing subtle cues—a penguin about to preen, an albatross lifting into flight, a grizzly poised to lunge at a passing salmon—allows you to anticipate moments rather than react to them.
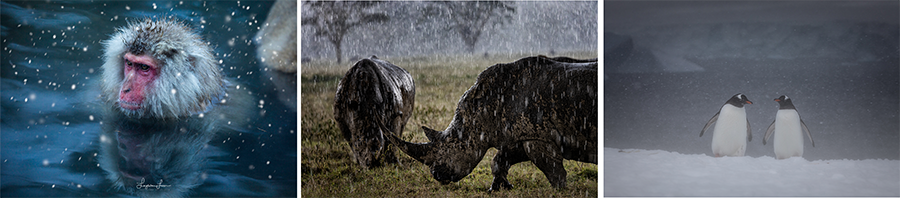
Embrace the Elements - rain, wind, cold, freezing sea spray - Nature often delivers less than comfortable conditions, but that’s where the drama lies. ‘Bad’ weather challenges both you and your gear, but it also gifts you with unforgettable images: penguins huddled in a storm, sea mist swirling over volcanic cliffs, animals enduring a rainstorm. For me, there’s nothing more depressing than a bluebird day. Nature never waits for perfect weather, and neither should you.
I hope these ideas have sparked new ways of thinking about your craft. The wild has so much to teach us—if we slow down, pay attention, and embrace the unpredictability. Let light guide you, let behavior reveal the story, and let the elements shape your vision. Most of all, get out there, put these ideas into action and make them your own. Wishing you bold adventures and beautiful light—happy shooting!

Regular Photography vs Low Angle Photography vs Low Wide-Angle Photography
We’ve previously written about the why’s and how’s of ‘going low’ when photographing wildlife, but let’s explore this idea even further...
We’ve previously written about the why’s and how’s of ‘going low’ when photographing wildlife, but let’s explore this idea even further.
Regular Photography

In this example, an uncluttered background and pleasantly out of focus background (i.e. ‘bokeh’) draws attention to the subject and helps separate it from its surroundings. Nothing wrong with this photo... but could it be better?
If the ground the animal you’re photographing is standing on happens to be visually interesting or exquisitely lit, there may be no need to change your perspective to capture a great wildlife image. But we’re usually not that lucky.
That’s the problem with ‘regular’ photography. By regular, I mean standing up, shooting from above photography. It’s hard to get anything but the ground behind the animal from this perspective and the ground is usually boring (monotone or just downright ugly dirt), busy or low-contrast relative to your subject - animals typically evolve to blend in, not stand out from their surroundings. Sure, you can zoom out to include sky and other landscape elements but if you look carefully, you’ll see that the horizon is above your subject so what’s actually behind the animal in the image is ground.
Low-Angle Photography


Lowering the camera allows you to have something other than the ground behind your subject. This can create separation/contrast or introduce elements that add variety and interest to your composition such as sky/clouds, trees, landscape features or just contrasting colors or tones. Direct eye contact, which often comes with being eye-level, can also make your photo more engaging by creating a stronger connection with the subject for the viewer.
Getting on your knees, or better yet, your belly, is the price to be paid but the results are usually well worth the little loss of dignity as you struggle back to your feet.
Low Wide-Angle Photography
The hardest but potentially most rewarding of the 3 options. This method of photography requires more pre-planning, a little more risk and a lot of luck. Chances of success are much lower, but the reward is a dramatic perspective with undeniable impact!
For this technique I typically put on my 15-35mm lens and try to position the camera in the path of my subject. Camera damage or loss is a real possibility. But when everything works, the images produced are often extremely impactful and quite different from your “average” photograph.


Trial and Error is key
A lot of failed attempts will occur before a successful shot.

Curious bear, but the camera is facing the wrong direction.

This bear fell asleep next to my camera. I waited for over an hour to retrieve it.

Success! Curious bear checking out my camera
You gotta risk it for the biscuit
Remember these are wild animals, and very powerful ones. Sometimes their curiosity can cause result in unfortunate consequences for your camera. You must decide if the rewards justify the risk – or at least find out if you’re insurance covers bear damage!


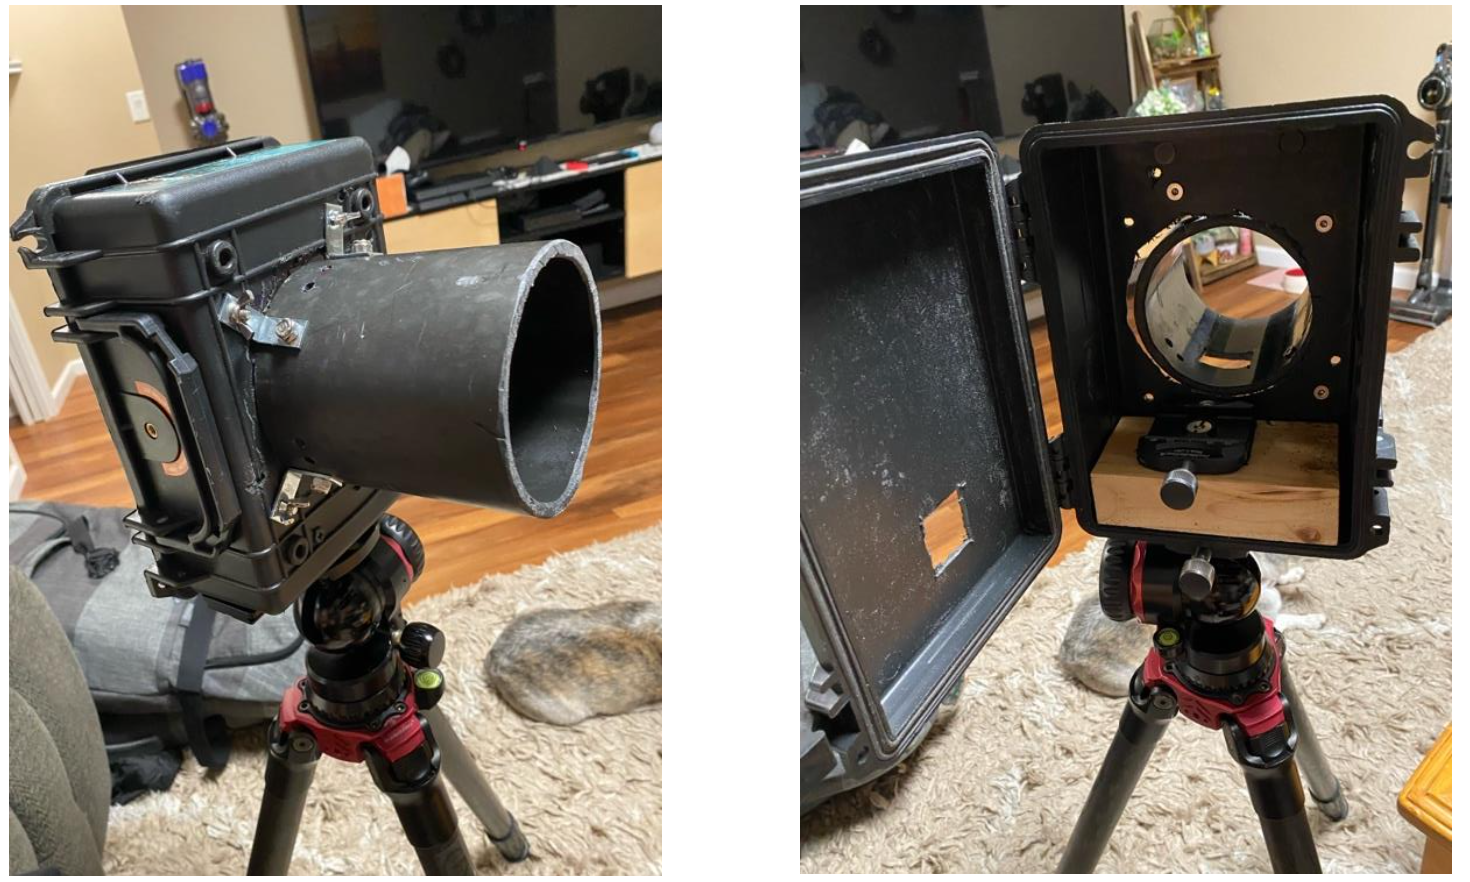
Protecting the camera. I made this contraption from a Harbor Freight “pelican” case and PVC...nothing fancy, but it works!
Keys to success with low wide-angle photography
Getting sharp focus on your subject’s eyes (not nose, ears, etc.) is always a challenge, but the ‘animal eye-focus’ capabilities of modern mirrorless cameras greatly increases your odds of success. It’s not 100% accurate, but produces more hits than misses. Even so, this type of photography requires a lot of patience and repetition.
You need a way to trigger the camera from a safe distance, especially when working with animals that are potentially dangerous. I personally use the Camtraptions trigger, but there are lots of options. One weakness of most trigger systems is the short wire connecting the receiver to the camera is easily damaged so it’s a good idea to carry a spare.
Observe animal behavior – knowing the typical behavior or habits of an individual will help you better you place the camera. With bears, some individuals are more curious or calmer than others. Some bears are more skittish and won’t go anywhere near the camera. Your guide is also a great resource as they’ve spent countless hours with these animals and know their typical behaviors and individual characteristics.
Keep trying - determination and repetition is the formula for success. You may not get it on the first try or the second but eventually one shot will work out! Knowing how difficult it is to get a shot like this makes getting the shot that much more rewarding.
Good luck and happy shooting!

Getting Down in Africa – Low Angle Photography Why & How
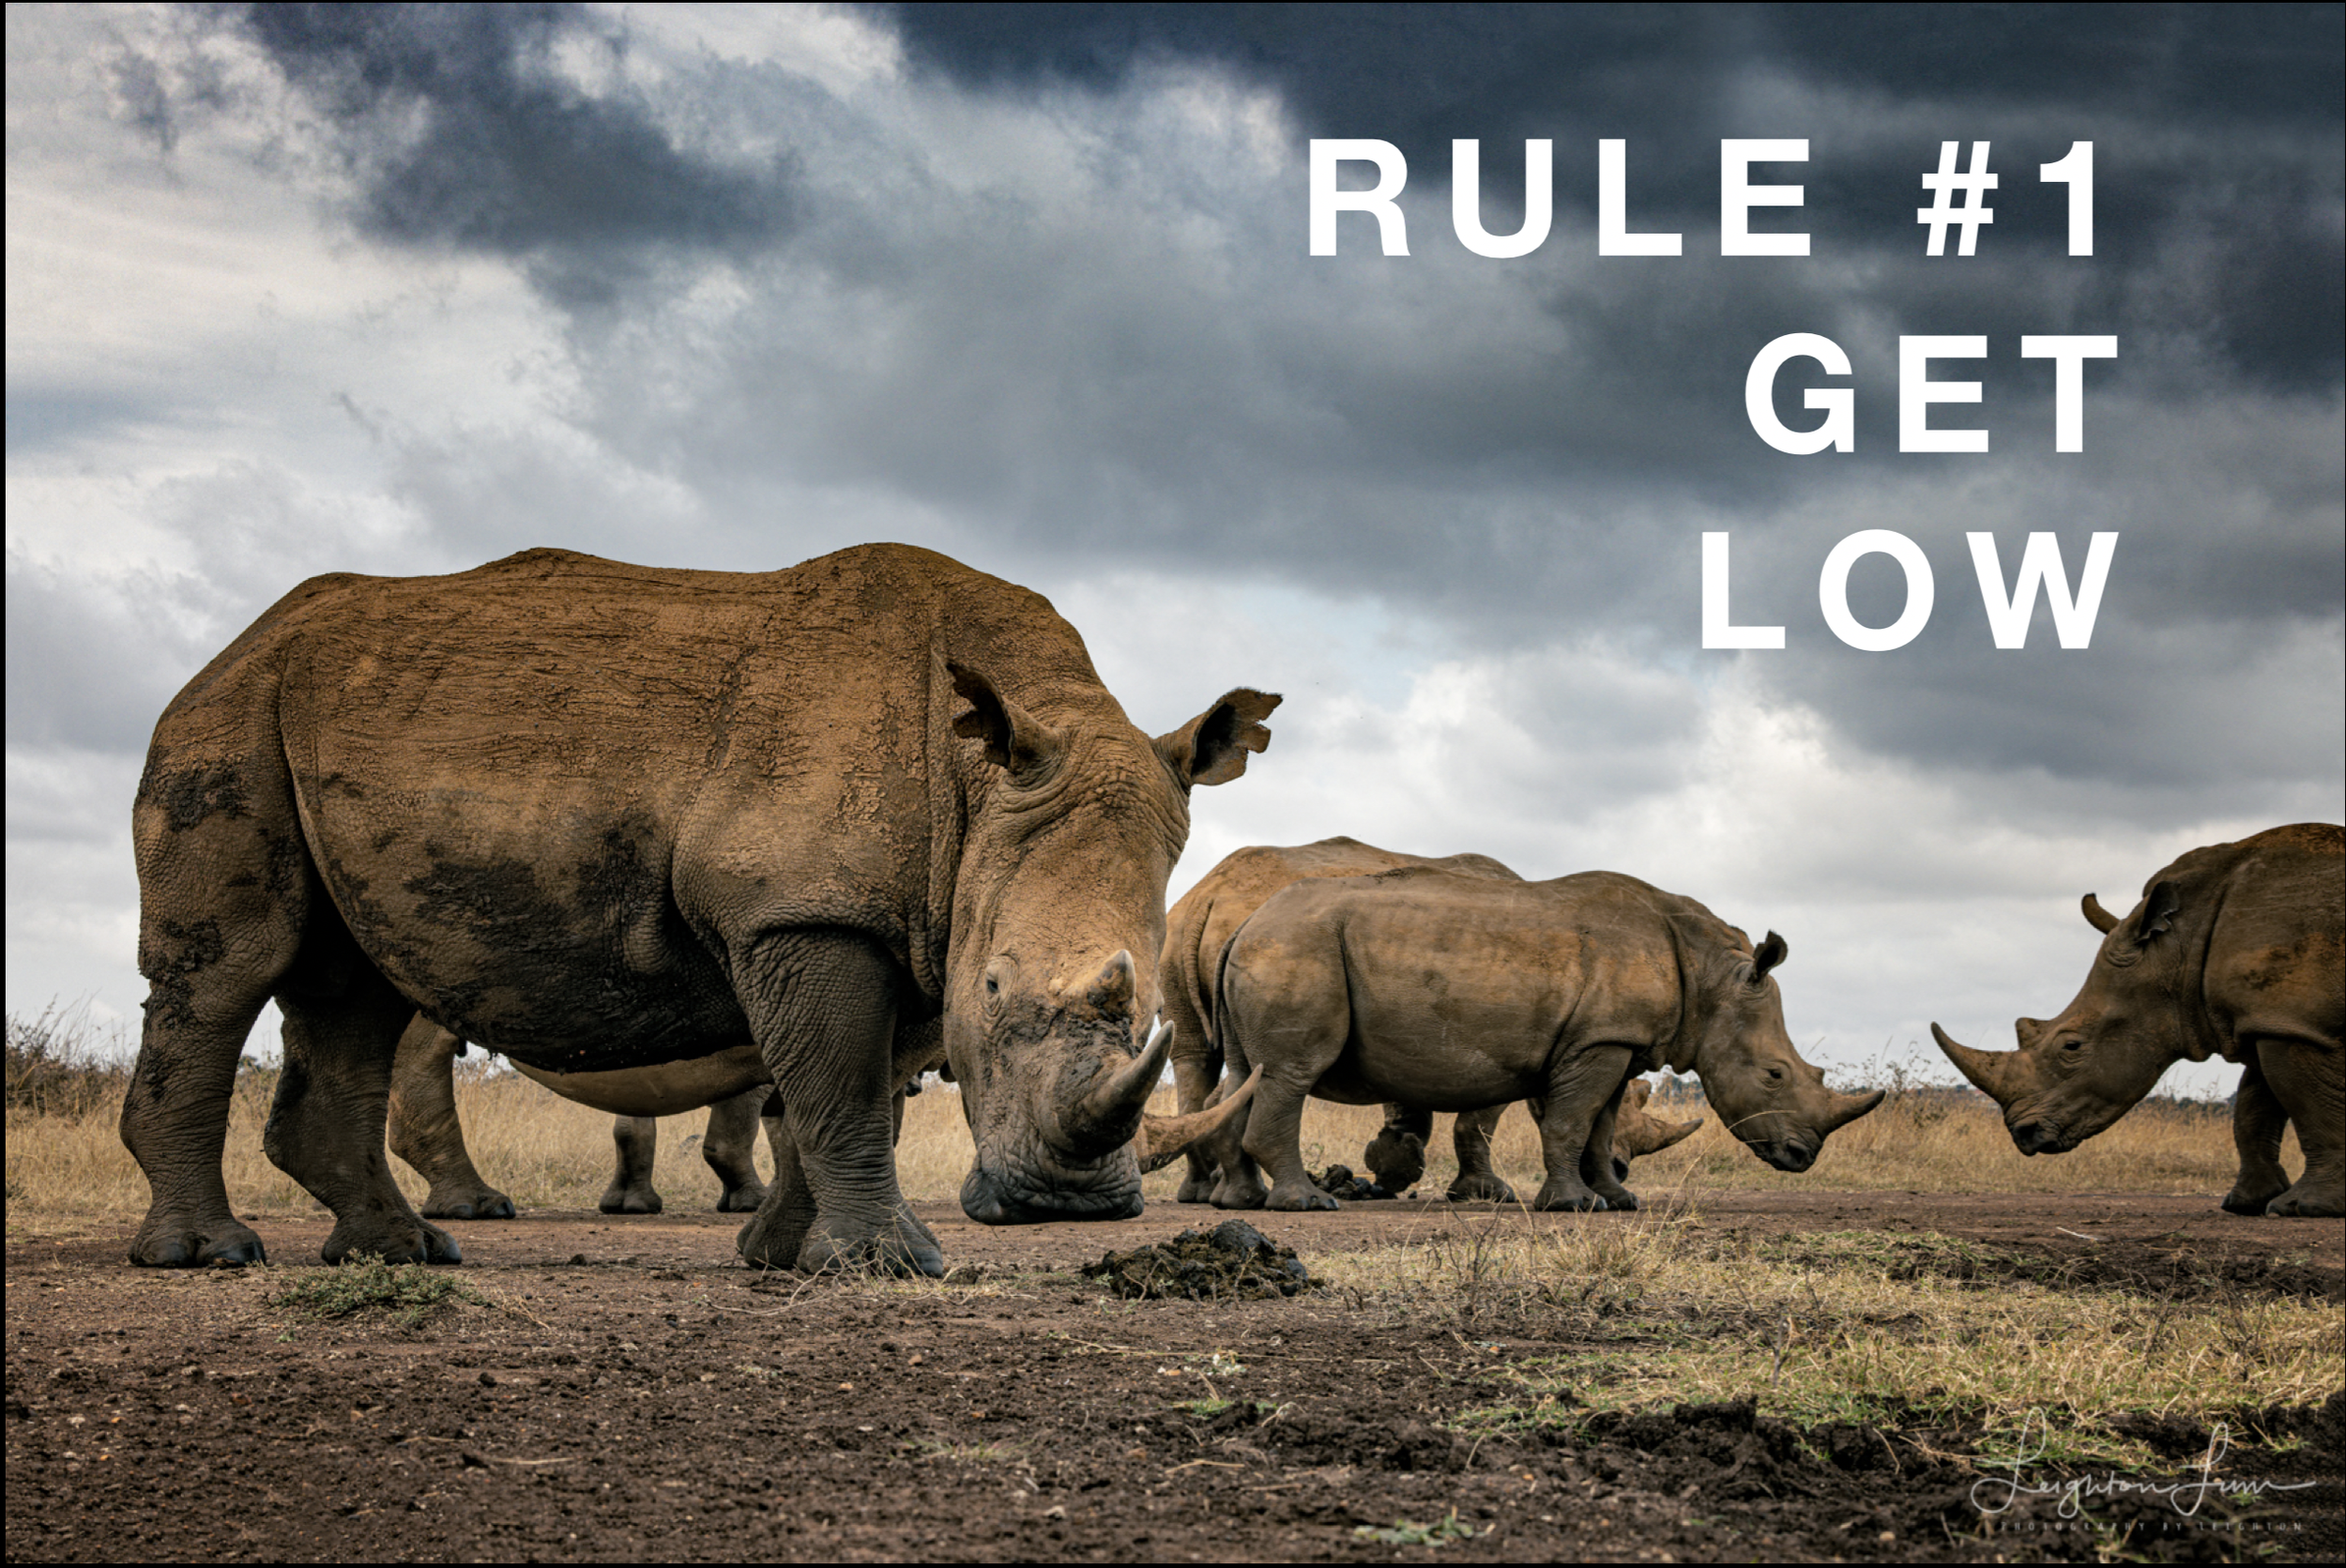
Rule #1 of wildlife photography is Get Low. But why? And how do you even get low when you’re confined to the inside of a safari vehicle as is almost always the case in Africa?

Rule #1 of wildlife photography is Get Low. But why? And how do you even get low when you’re confined to the inside of a safari vehicle as is almost always the case in Africa?
Why Go Low?
The change in perspective that comes with a low camera angle (subject eye level or below) can be helpful in many ways:
Eliminate busy, boring or low-contrast backgrounds - when photographing animals from above, it’s hard to end up with anything other than the ground as a background. While that’s not necessarily a bad thing if the landscape or light is interesting, shooting from near ground level gives you options, like having sky behind your subject. Predators and prey are also naturally evolved to blend into the landscape which is great for survival but not always helpful for pictures.
Create connection – direct eye contact creates a powerful connection with your subject but it’s harder to achieve from above - parts of the eye are often obscured by the shadow cast from the eyelid or brow. A low angle helps you clearly see the subject’s pupil and iris. The result is a subtle but noticeable increase in impact.
Something different - a very low perspective also adds interest simply because it’s novel – it’s not the usual way we view animals. It also increases your subject’s ‘gravitas’. If you want an animal (or person) to look bigger or more imposing, shoot from below.
Show me, don’t tell me

It’s easier to show than explain, so take a look at the example images in this post and linked gallery – hopefully the difference and benefits will be obvious.
Getting Down
Now that we understand some of the benefits of a low camera angle, it’s time to move on to how to accomplish it. My friend and often co-workshop leader, Leighton Lum, introduced me to his Low Angle Monopod method during my first trip to Africa and it’s responsible for some of my favorite images.
DISCLAIMER: Use this technique at your own risk! It involves sticking parts of your body outside the safety of the safari vehicle – don’t get so absorbed in taking pictures that you lose situational awareness. If a curious lion approaches too close, get all of yourself inside the vehicle immediately even if it means leaving your equipment outside temporarily.
Equipment – The Basic Rig
Camera –it’s possible to make this technique work with a dSLR, but a mirrorless body, especially one with an articulating screen and Animal Eye Focus capabilities are really what you want.
Lens – a medium telephoto like a 70-200 mm is our recommendation. A rotating collar mount is especially helpful so you can orient your camera right side up
Monopod– nothing too special here, most models will work but something lightweight will help minimize arm fatigue. A ball head is optional but keep it lightweight as well.
Remote Release or Camera App – you’ll need a way to trigger your shutter. Every camera manufacturer makes a wireless remote release for their cameras and there are plenty of third-party options as well, all relatively inexpensive. I really like these remotes by JJC for Nikon, Canon & Sony because they work via Bluetooth, eliminating the need for a receiver/connecting cable (requires a camera w/Bluetooth capability). Your camera manufacturer’s mobile app can also serve as your remote release but we’ve seen mixed results – sometimes there’s a slight delay between pressing the button in the app and the actual camera shutter click.
The Technique
Establish a connection between remote release and camera following the instructions of your remote release hardware or app.
If using a ‘traditional’ remote release, mount the receiver in the camera’s hot shoe and connect the cable from the receiver to the appropriate port on the camera.
If using Bluetooth remote or camera app, create a wireless connection between the remote trigger and the camera according to instructions provided
Set Autofocus – Enable Animal Eye Focus and use it conjunction with the Wide/Large area or Full Screen option in AF area setting if possible.
Rotate Lens Collar – so that the mount foot is facing up and attach monopod
Tilt your LCD screen up so it’s facing up and viewable from above
Test – make sure everything (camera and remote release or app) is turned on and give it a try. Make sure you can activate autofocus and fire the shutter using your remote release or app. Practice passing the rig through a vehicle window, lowering the camera, finding and focusing on your subject, and firing the shutter. Adjust your zoom as necessary and leave plenty of room to crop and straighten crooked horizons.
Be patient and keep practicing. It’s normal to feel clumsy at first and your results may be less than stellar. This will improve with practice.
Note: if you use Back Button focus and have disabled Shutter button AF activation, you may need to re-enable it
Randall's rig
Options & Finer Points
Look, listen to your eyes – the low angle technique is a great arrow to have in your quiver but it’s not always the right choice for every image.
Switching between low angle and regular shooting is time consuming. If possible, it’s nice to dedicate a second body to low angle shooting.
The cable connecting your remote receiver to the camera is easily damaged. Carry a spare and be careful not to pinch or stress the cable connections.
In bright daylight the monitor can be hard to see. An LCD shade might help, but also keep in mind it’s not necessary to see every detail - you’re relying on the camera’s AF to achieve focus and seeing less detail is often helpful for composition.
Next level – Randall Ball’s new and improved version of the low angle rig. We’ll save the details for another post but leave it to a Cajun to take things up a notch.
Have fun, be safe, good luck!

The G.O.A.T.
Our 2018 Scouting Mission to Ladakh (Indian Himalayas) was the epitome of epic adventure travel. Every day, we said it couldn’t get better. Every day it did. Tears ran down cheeks on the final night, as we stood on the roof of a thousand-year-old monastery photographing the Milky Way with the rumbling soundtrack of throat-chanting Tibetan monks.

A monk calls his brothers to Morning Prayer
“My favorite trip of all-time? It’s a question I’m asked often. I usually give some wishy-washy answer because it feels like I’m being asked to choose a favorite child. But it’s always Ladakh that comes to mind, all due respect to my other “children” - I love you all. ”

Our 2018 Scouting Mission was the epitome of epic adventure travel. Every day, we said it couldn’t get better. Every day it did. Tears ran down cheeks on the final night, standing on the roof of a thousand-year-old monastery photographing the Milky Way with the rumbling soundtrack of throat-chanting Tibetan monks.
Little things like a pandemic have kept me from returning, but I’m finally going back in April 2024. Come with me and let me show you why Ladakh is my Greatest Of All Time!
What & Where is Ladakh?
Ladakh is a mountainous region in far northern India bordering Tibet. The Himalaya mountain range dominates much of Ladakh’s territory. The history, people, and culture here are more closely associated with Tibetan Buddhism than the rest of Hindu-dominated India. Indians often describe Ladakh as, “Heaven on Earth.”
What’s it Like in Ladakh?
Wild, Remote. Other-worldly. That’s how my first visit to Ladakh felt. The biggest mountains in the world make for some truly grand landscapes. Vast spaces, really vast and starry skies that make you feel really small. Monks and nomads living lives from another time. There are not many places like this left. I wonder how it will feel when I return. I wonder what I missed the first time. I wonder what’s changed.
Show Me, Don’t Tell Me
I get it, we’re photographers, shut up and show me the pictures. Here you go: Ladakh Photo Gallery


2024 Trip info
Want to See and experience this magical land for yourself? Click here for full details about our April 2024 Ladakh Himalayan Adventure photography workshop
Is India Your Cup of Chai?
I love India. Photographically, it’s been a personal goldmine – the source of more ‘portfolio-worthy’ travel images than any other destination – but I also find the culture, the history, Hinduism and all its offshoots endlessly fascinating as well.
But India might not have the same appeal for everyone, as I unexpectedly discovered.

Worth a watch: photographer Joey L in Varanasi, India creating images for his series, Holy Men

Chai wallah in Varanasi
Varanasi, India: Beyond is available on YouTube, Vimeo and Joey L’s website
I love India. Photographically, it’s been a personal goldmine – the source of more ‘portfolio-worthy’ travel images than any other destination – but I also find the culture, the history, Hinduism and all its offshoots endlessly fascinating as well.
But India might not have the same appeal for everyone, as I unexpectedly discovered. While researching for my first trip to India I ran across the documentary, “Varanasi, India: Beyond” and instantly added Varanasi on the Ganges to my itinerary. Ancient, exotic and the epicenter of the Hindu religion, this film confirmed that Varanasi was exactly the kind of place I dream of exploring. I’d been planning a solo scouting mission but started thinking it might be nice to have some company. So, I hatched a plan to recruit my wife and my friend David as travel companions. I invited David over for dinner and afterwards, I casually mentioned this fascinating India doc I’d come across and hit play. I sat back confident David and my wife would both be begging me to come along once they got an eyeful of Varanasi’s ancient buildings, twisted lanes and riverside stone terraces (‘ghats’) teeming with devout pilgrims accessing the blessed waters of Mother Ganga, the Ganges river. Even more captivating were the actual subjects of the documentary, religious ascetics…holy men, known as Sadhus and Agghori’s. As the credits rolled, I turned to my companions and said, “now doesn’t that just make you want to go there and see it for yourself?” After an unexpected silence, David looked me straight in the eyes and answered for both, “Ken, not no, HELL NO!”
I was shocked….and humbled. India can be a bit…gritty, it’s true, especially for western eyes. But that’s reality and isn’t that so much more interesting than some sterile manicured resort? Obviously, I had my answer, at least as far as my wife and friend were concerned.

India: my travel photography Nirvana
What about you? Add Varanasi, India: Beyond to your watchlist – it’s free and I promise you’ll find it fascinating as a photographer regardless of your ideas about India. It follows photographer Joey L as he creates images for his series, Holy Men. Let me know afterwards if you add India to the bucket list or decide to save it for another lifetime. If India seems like your cup of chai, get in touch or join us in March 2023 for our next Colors of India photography adventure.
Happy Holidays, Everyone!

What Africa Teaches the Heart
My first Africa safari ended some time ago but I’m still struggling to process the experience, not to mention the over 8,000 photos I captured there! But it’s hard. Not because of the mountain of images to plow through, but because…

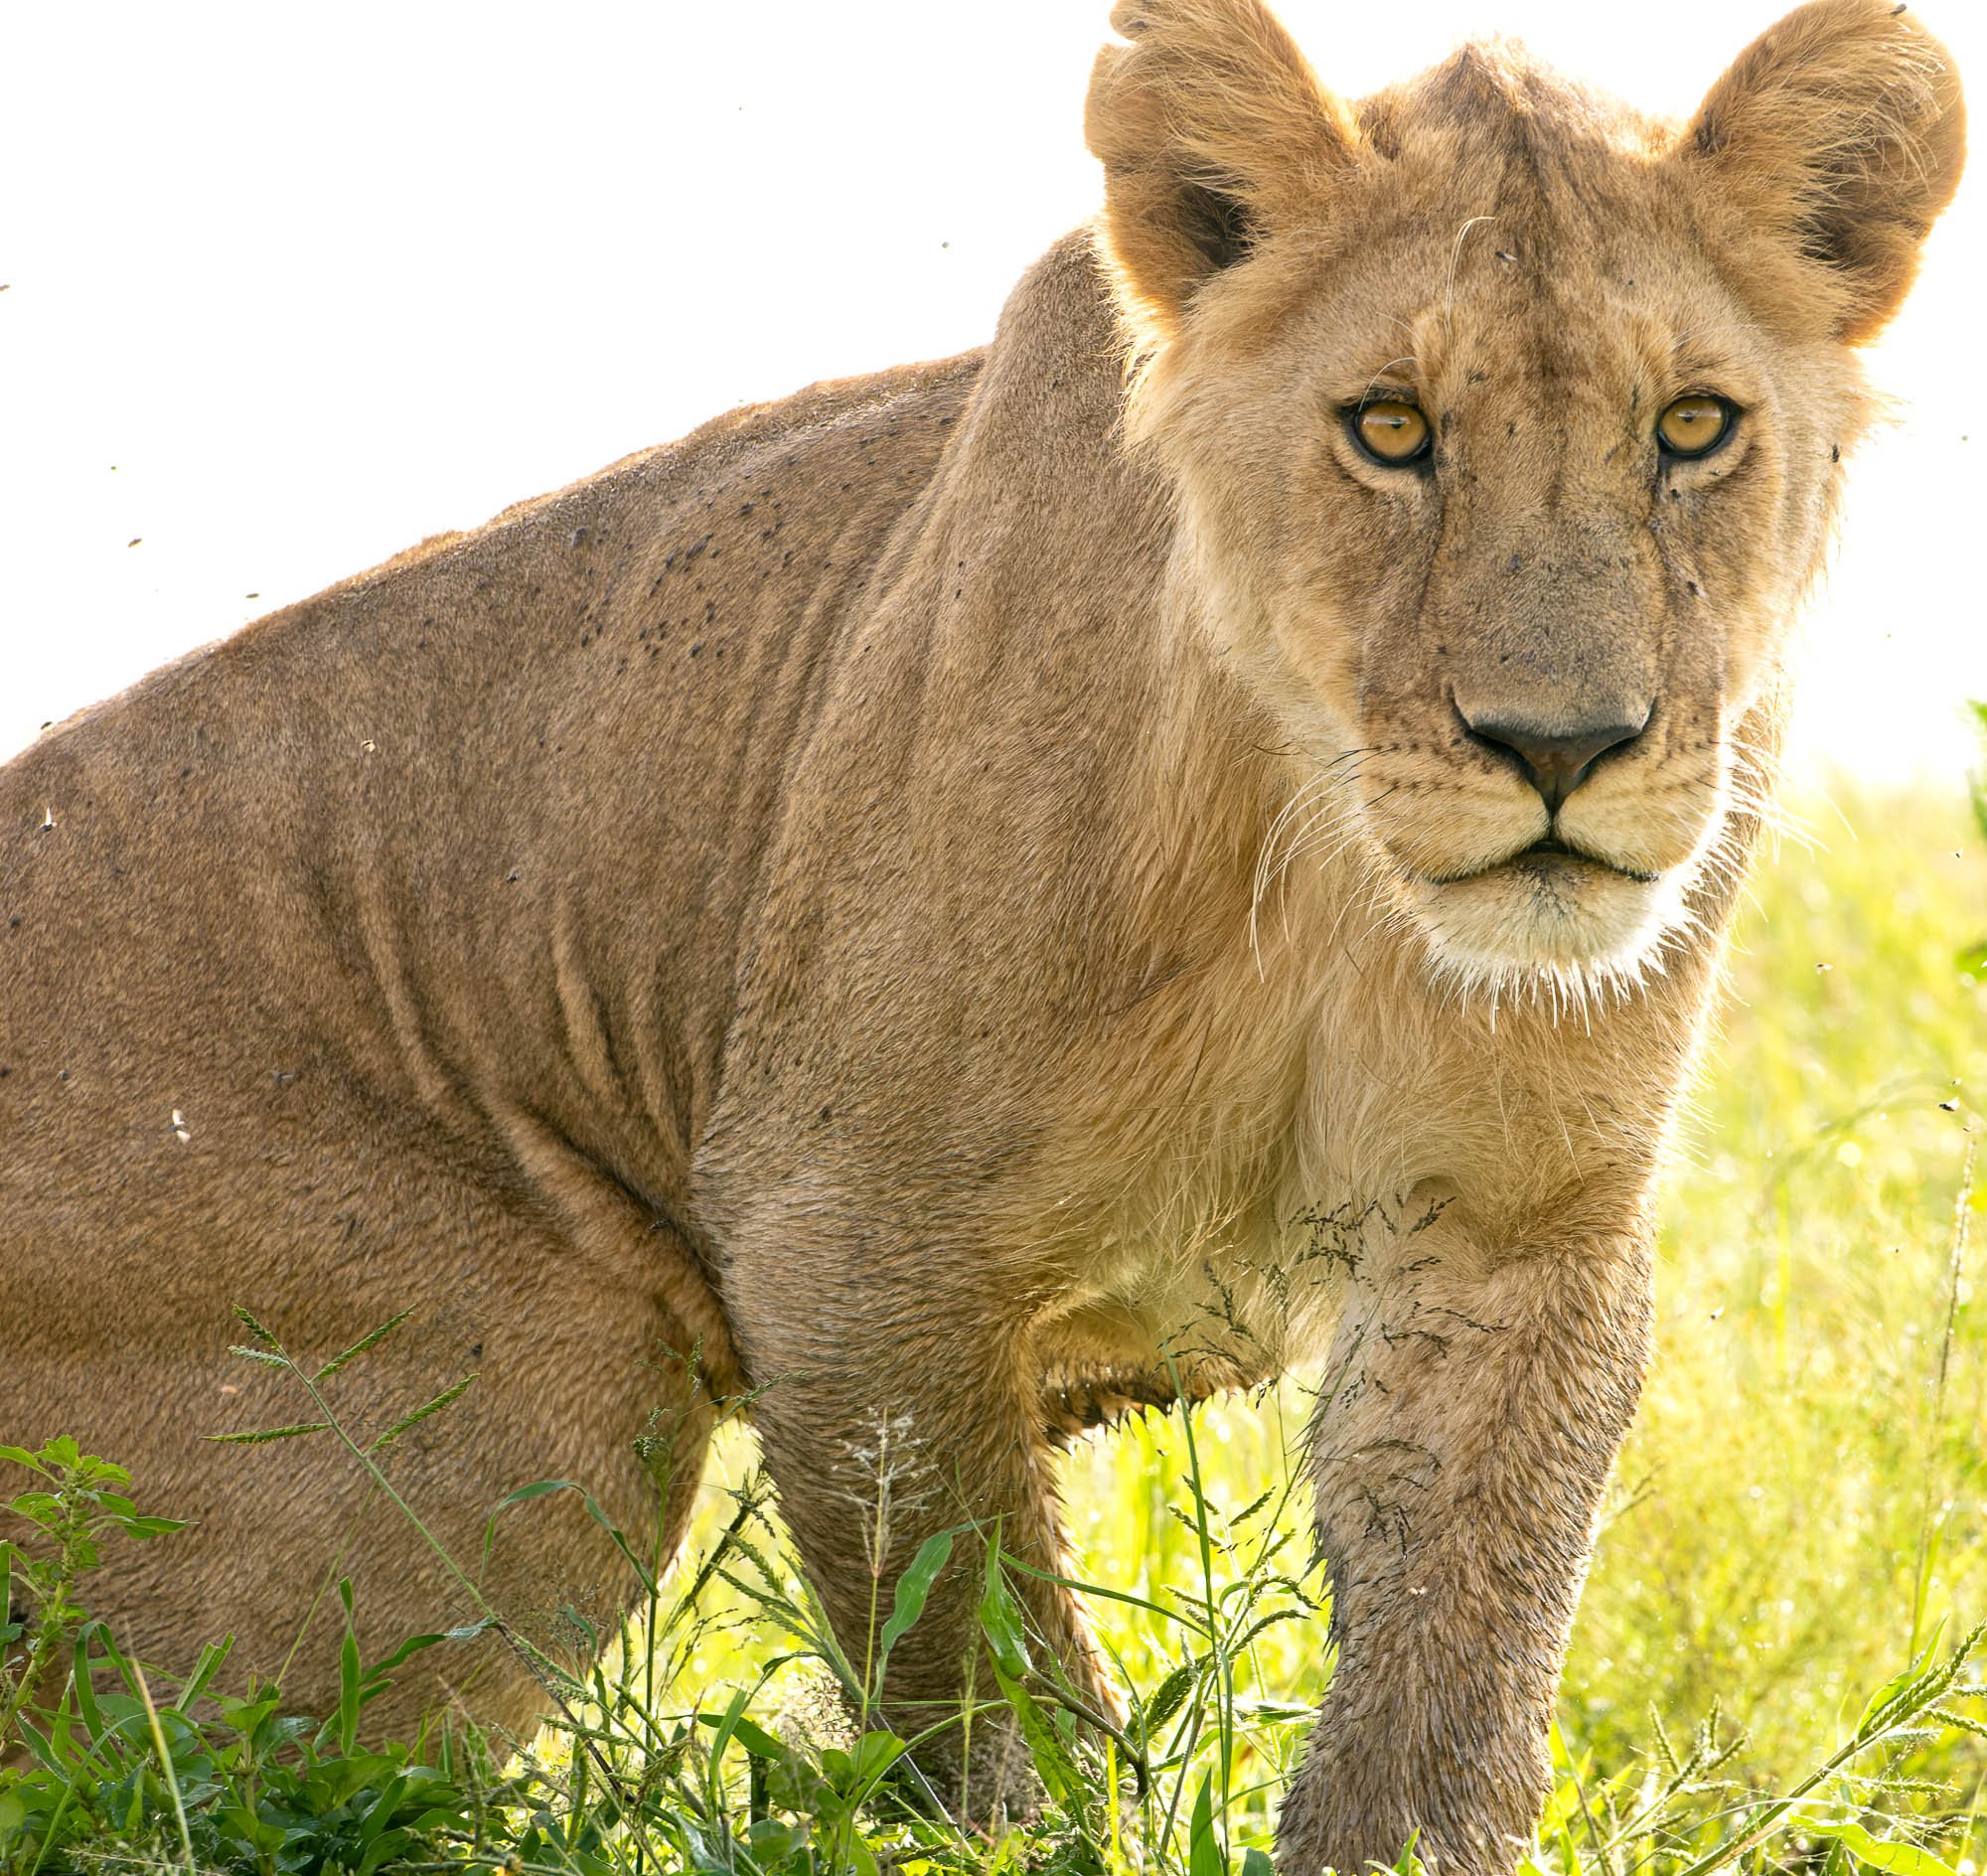
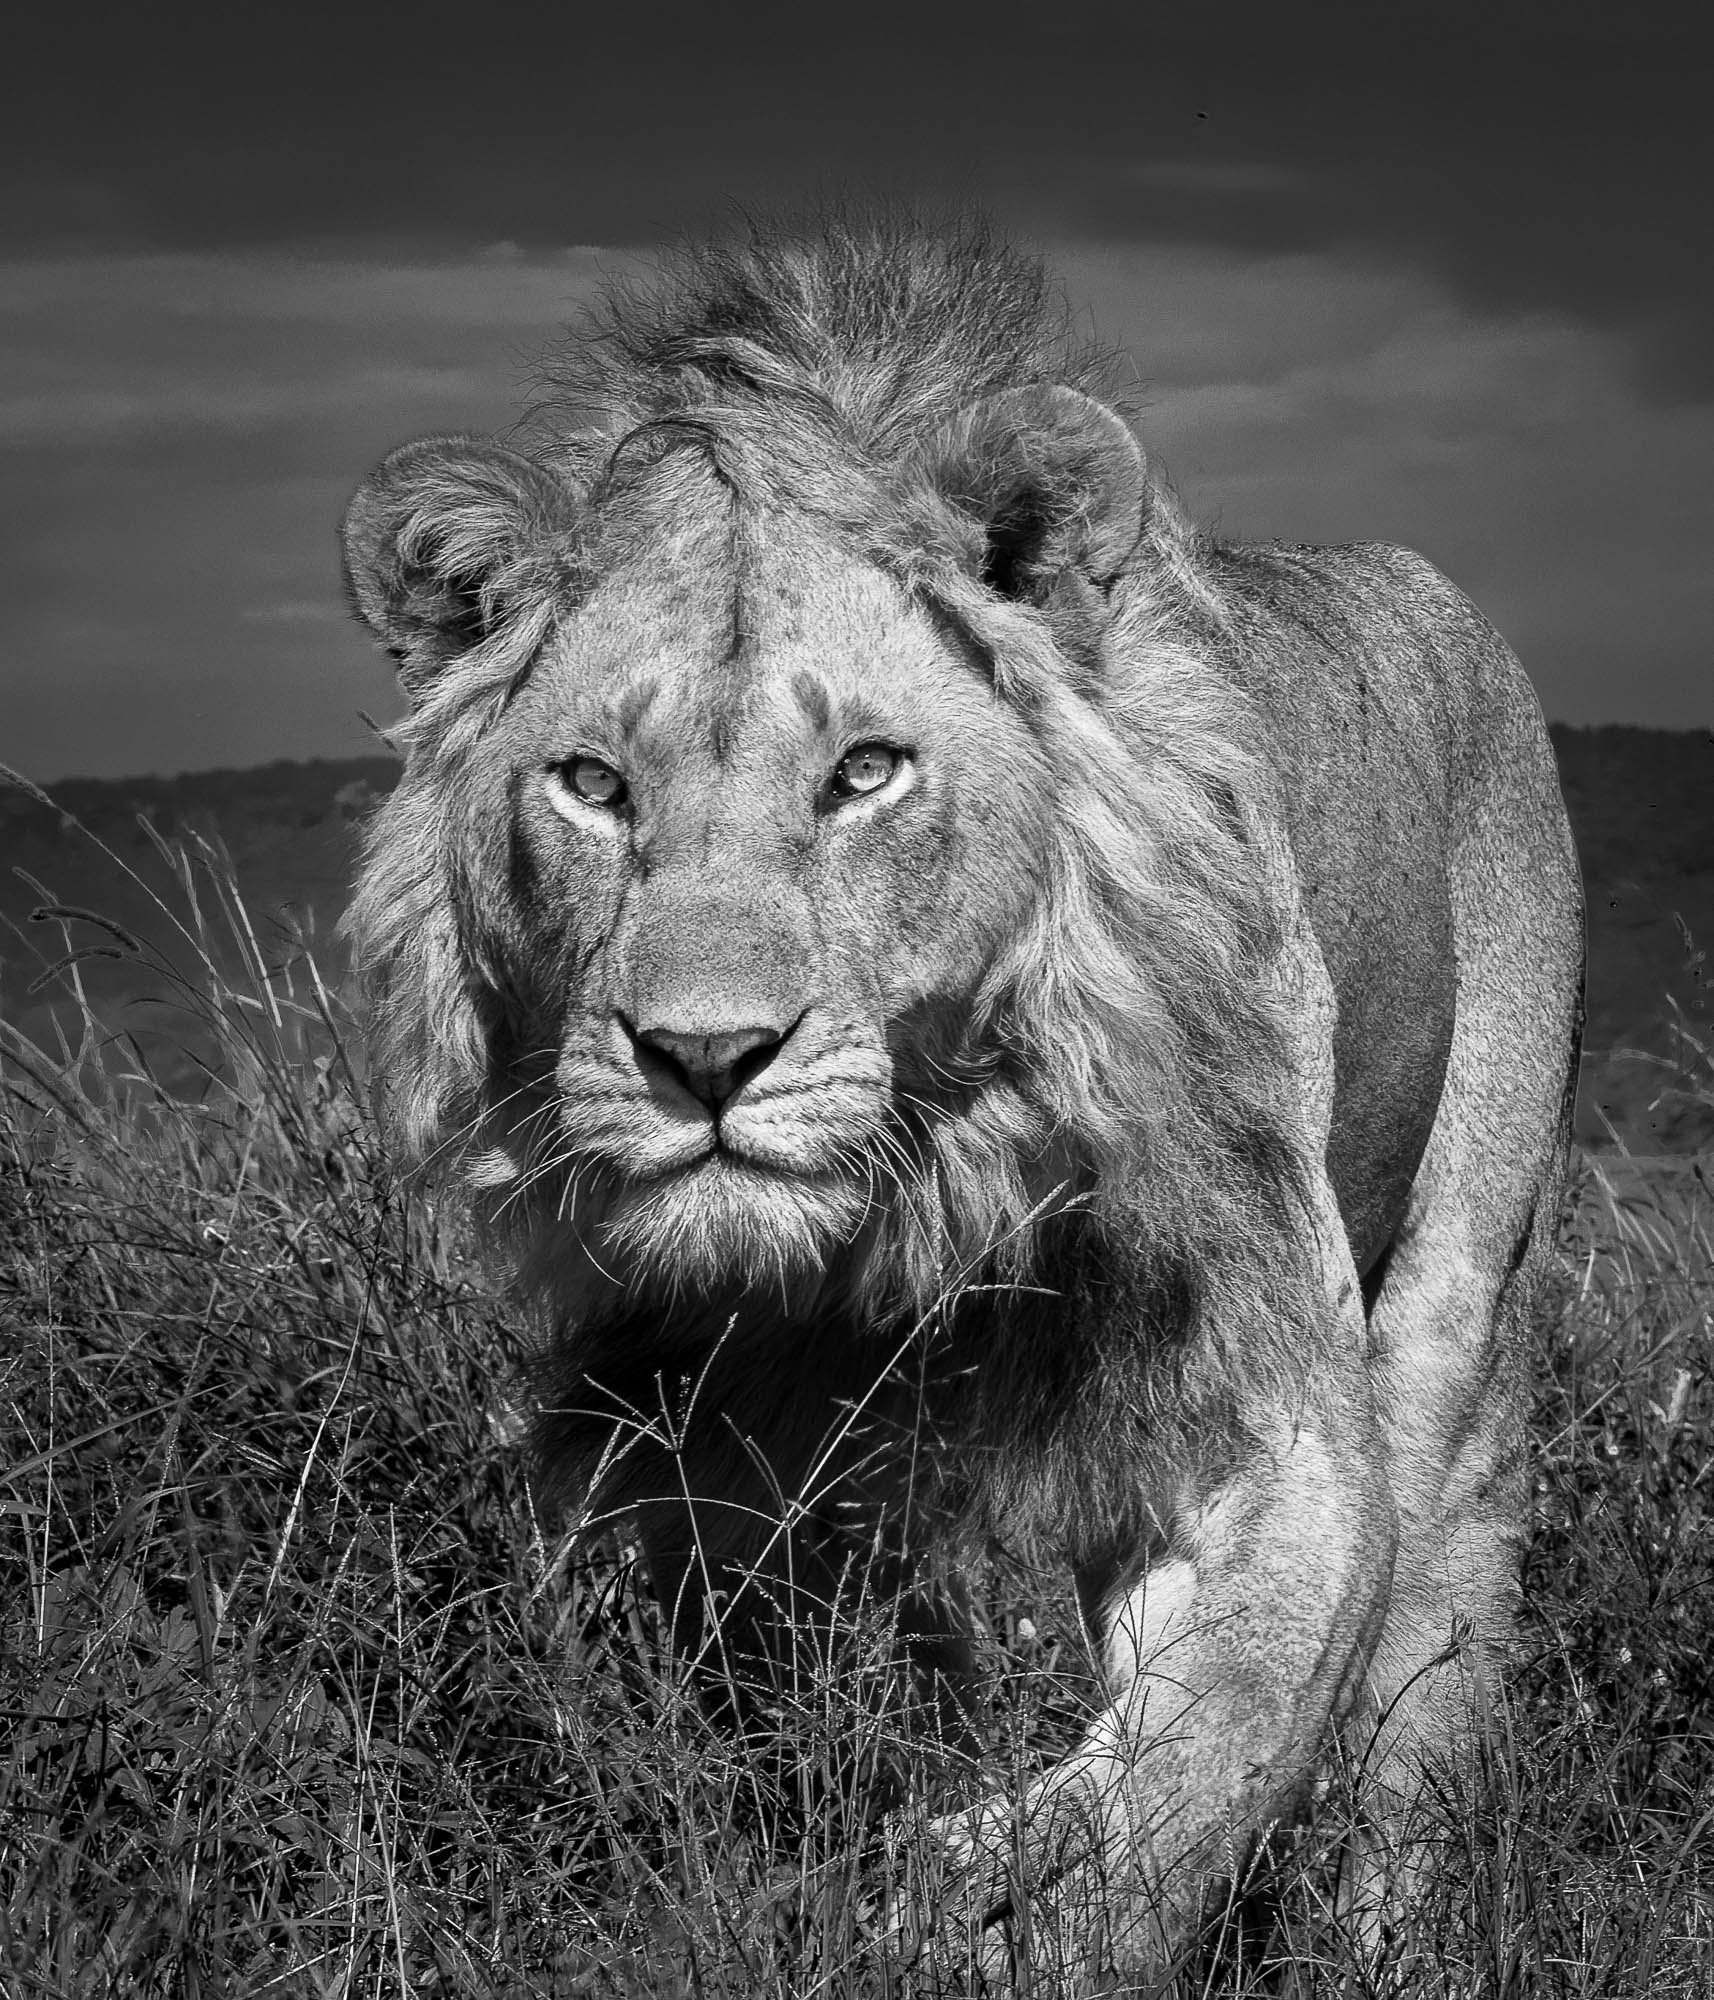
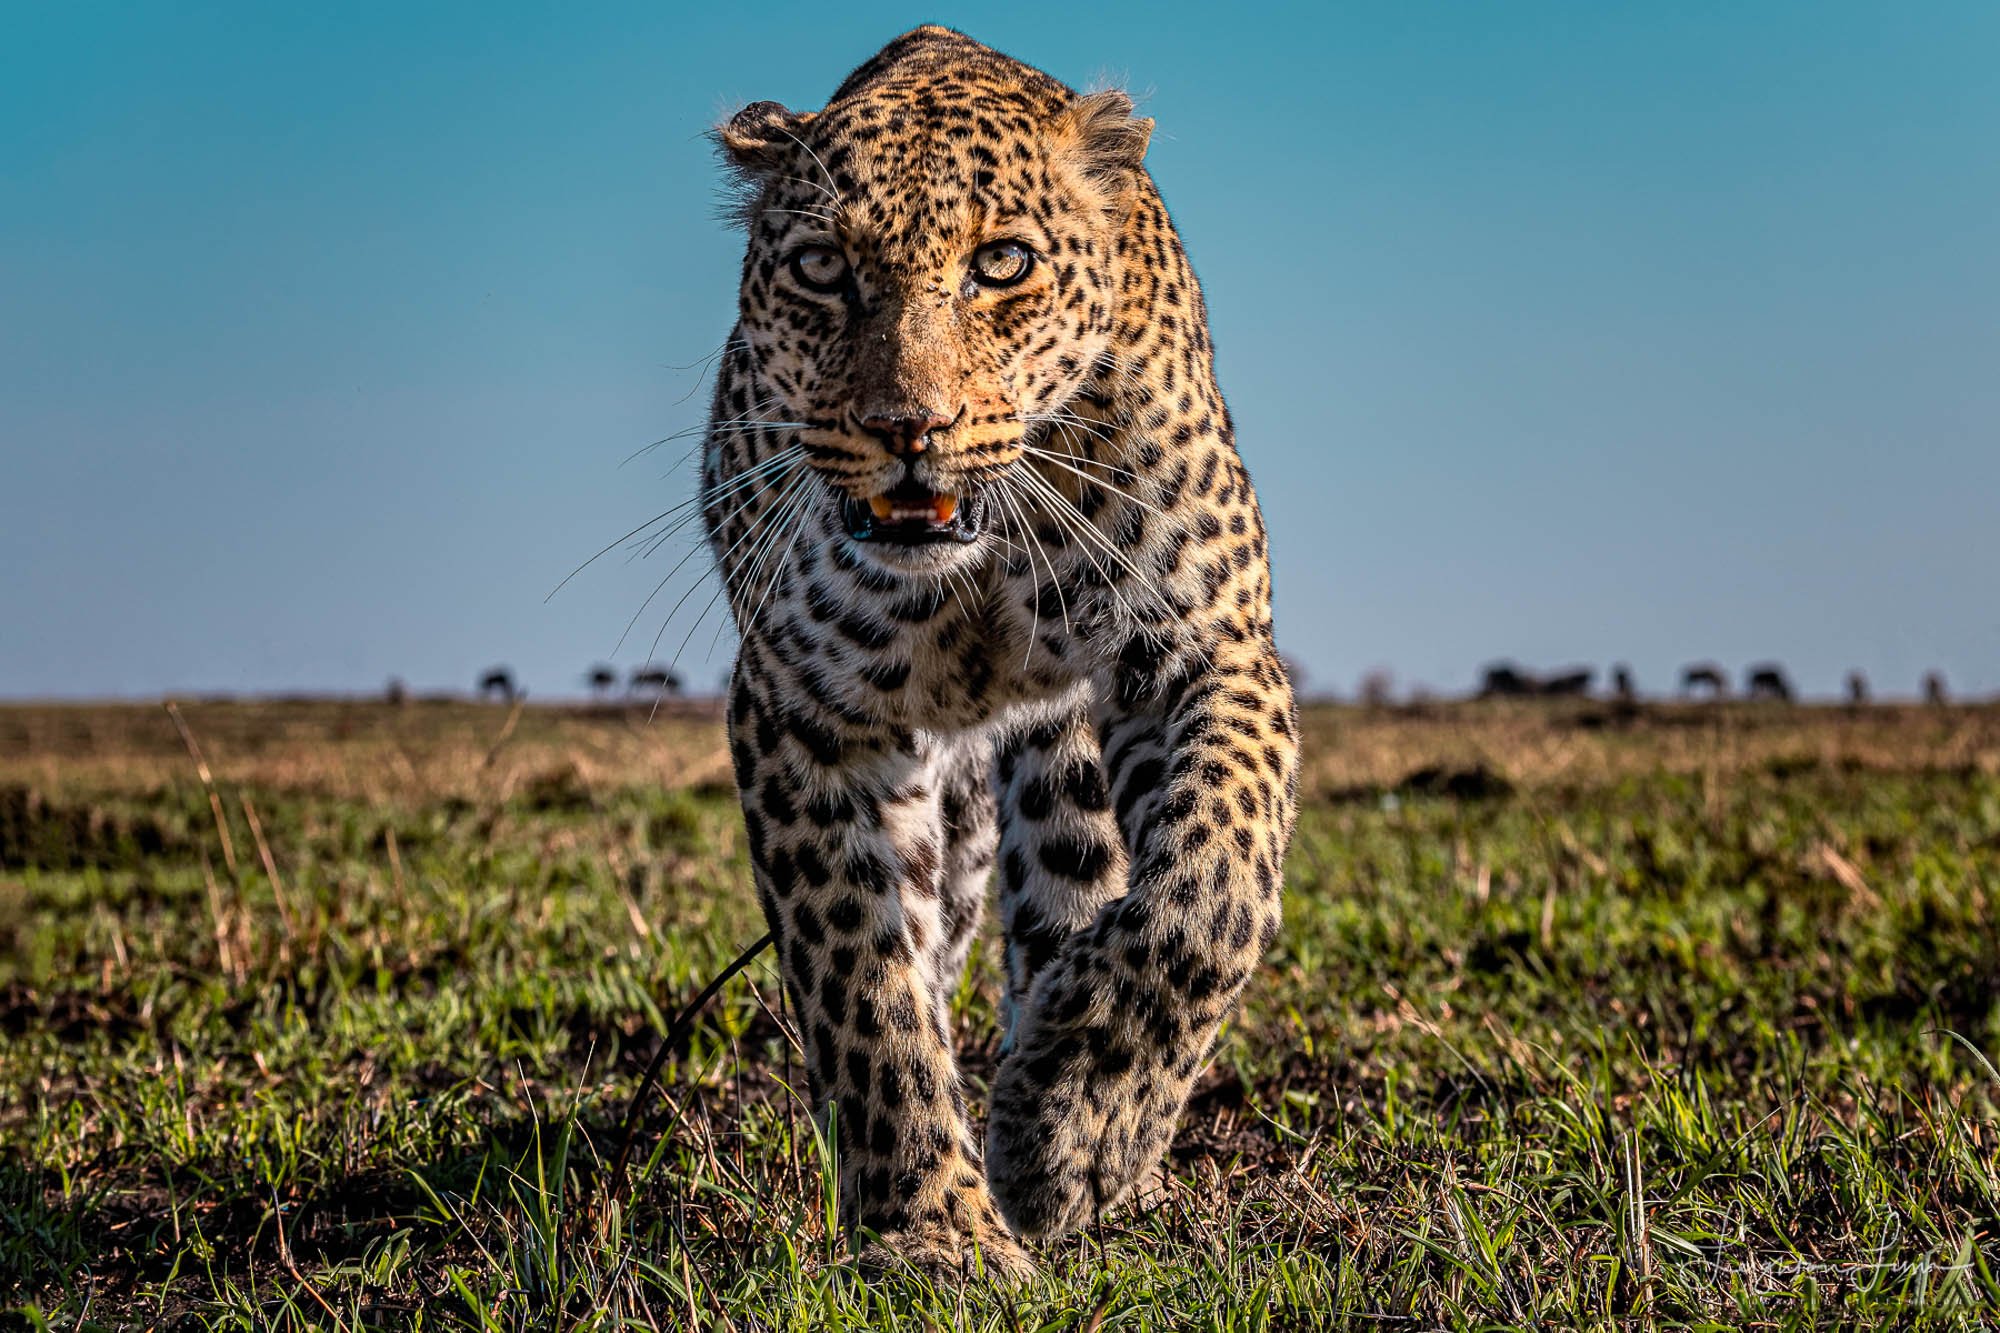
Lion in lovely light
Every Expectation Exceeded
My first Africa safari ended some time ago but I’m still struggling to process the experience, not to mention the over 8,000 photos I captured there. But it’s hard. Not because of the mountain of images to plow through, but because Africa exceeded my expectations in every way. From the mind-blowing quantity and diversity of wildlife everywhere – herds of elephants or giraffes around every turn, thousands of antelope and gazelle, dinosaur-sized birds flying around like pigeons, uncountable numbers of zebra and wildebeest - to the unbelievable quality of the photo opportunities – lions in sublime light, cheetahs so close they sent me scrambling for a wide-angle lens, observing the drama of the hunt from start to finish multiple times - every day had our group convinced that it just couldn’t get any better. But it did. Right up until the final morning when we witnessed two male lions chase down and kill a hyena with savage vengeance. In the aftermath, there was no doubt that this act was more about hatred than hunger.
But even then, it wasn’t over. Like a conductor bringing her audience down from the climax of a symphony, the final movement began with the slow-motion swaying of giraffes in mock battle, the entire ballet mirrored in a pool of still water. If I wasn’t busy focusing and firing frames, I would have cried. Minutes later we were at the airfield, waiting for the plane that would begin our journey home.

Just Do It
My first trip to Africa won’t be my last. I’m thrilled with the shots I got, but the misses are going to eat at me for some time. But honestly, photography is just an excuse to experience moments like these. I’m already planning another crack at the Great Migration for February 2021 with fellow photo workshop leader, Leighton Lum. But I’m pretty sure that will only mark the first of many return trips to this wildlife nirvana. If you share my passion for observing and photographing the natural world, come to Africa. Come with us, come with someone else, come on your own. Find a way, plan it, and do it. I promise you won’t regret it.

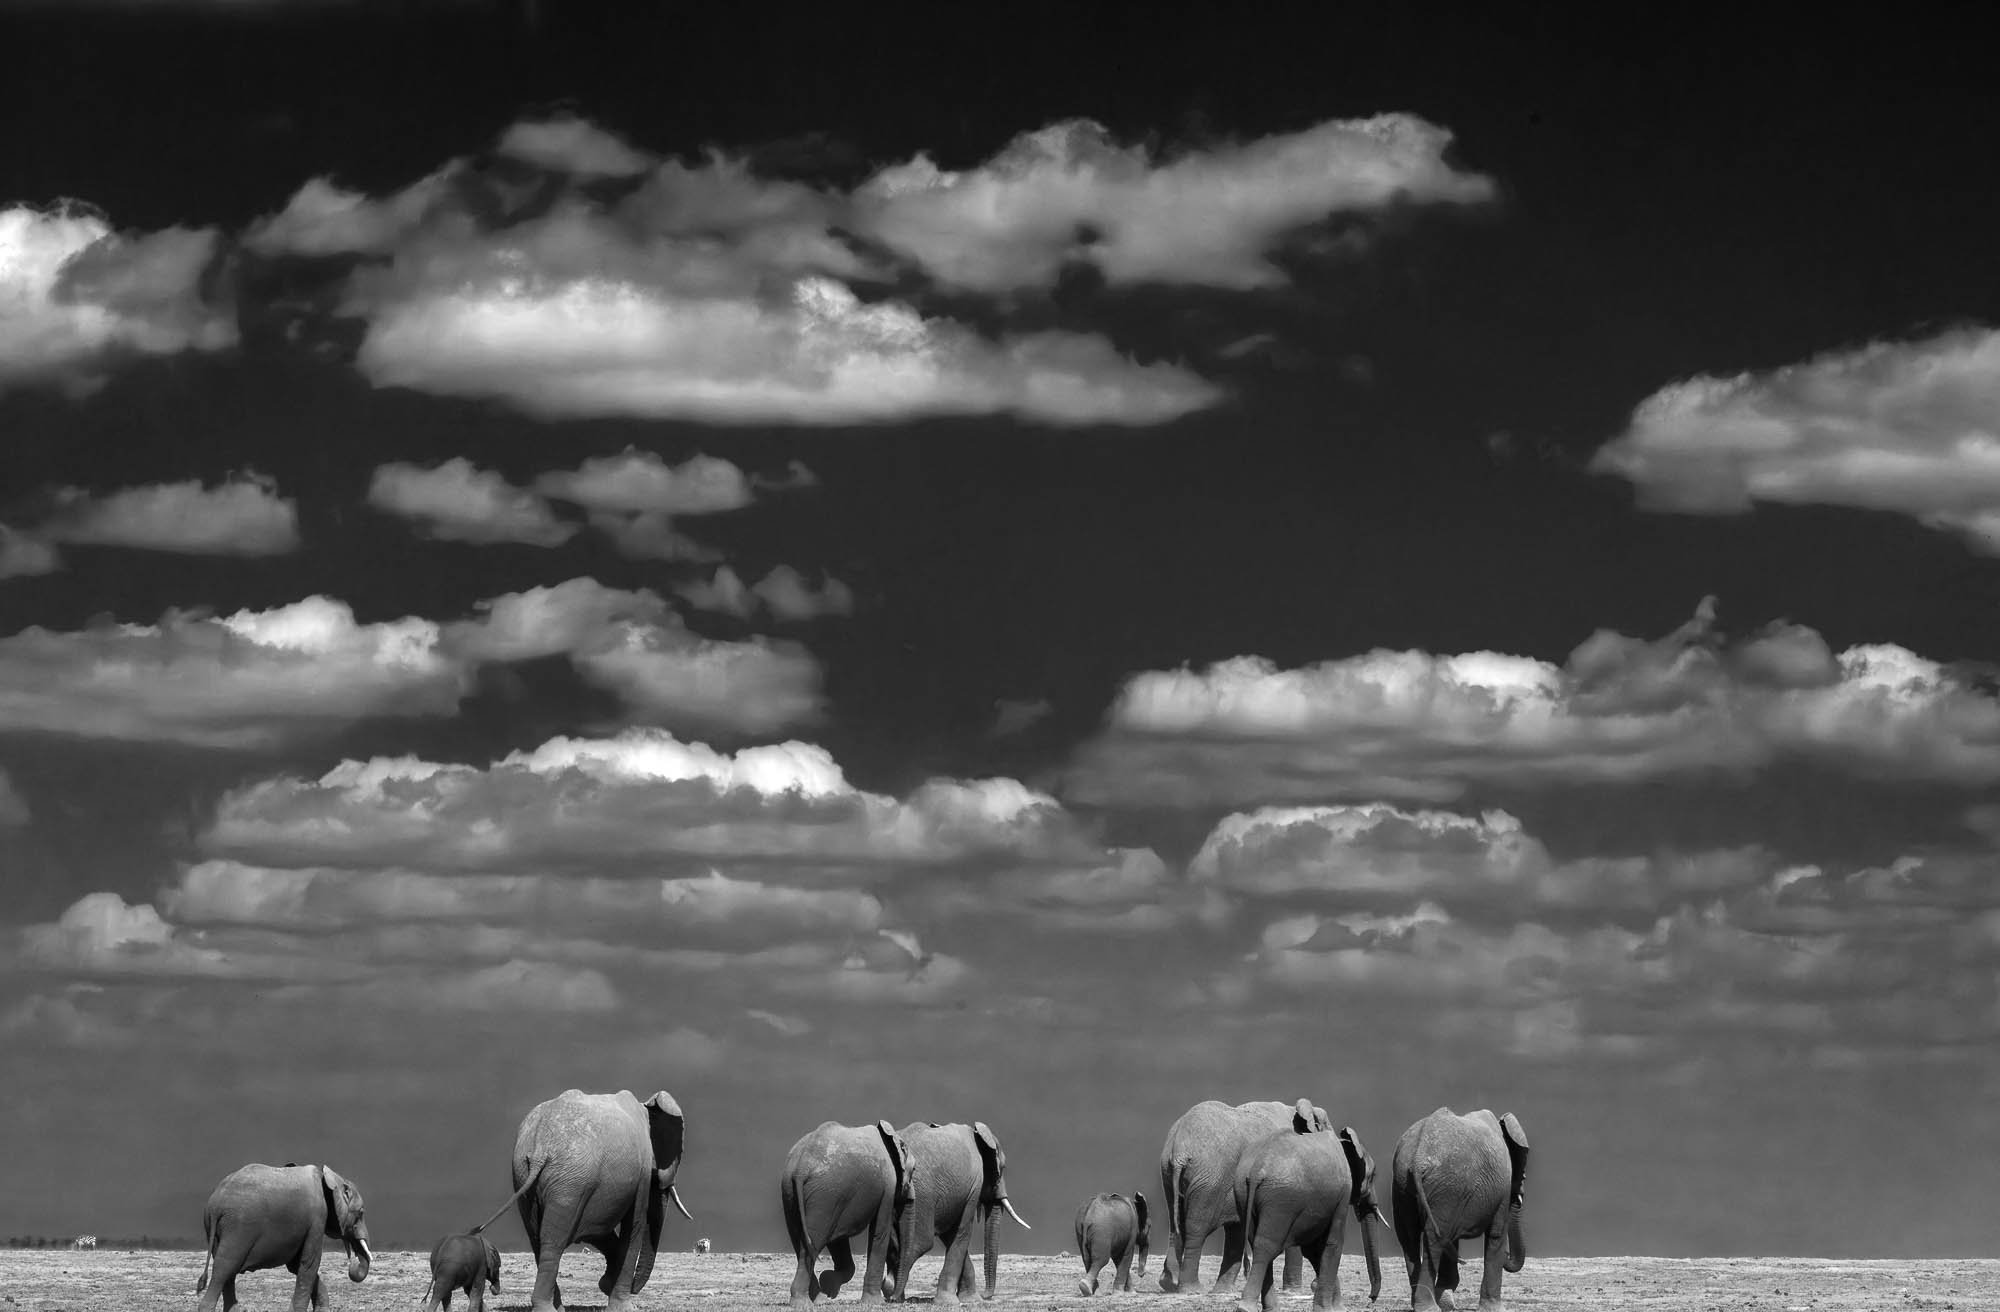
Tuskers & Kilimanjaro
Changing the Story
If you can, bring a child. Because it will be their generation that decides the fate of places like this. Pessimism about the survival of the natural world abounds and it is justified. We’ve lost so much already. But there’s also reason for hope. To save a thing, you need to first fall in love with it. My generation fell in love with the big black eyes of seal pups on the ice, the idea of oceans with whales, and seeing the majestic symbol of our nation, the bald eagle, outside of a zoo. Maybe these are isolated success stories and maybe it’s wrong to draw attention away from the battles still before us. But ideas are powerful...even stronger than fear. Fear freezes, but inspiration fuels action. Sparks are needed to ignite fires but we can’t count on YouTube and Xboxes to set young minds ablaze.
Before I stared out across the Serengeti, over the backs of a herd of wildebeest so vast I couldn't find its end even with binoculars, the stories millions of bison once roaming our Great Plains were just that, stories that lived in my head. After seeing the Great Migration with my own eyes, I understand in my heart what we once had and lost. We may never recover all that we’ve squandered but perhaps young hearts inspired by the sight of a world that once was will be foolish enough to try. And that might just be enough to change the story of life on this planet.


How to Holi
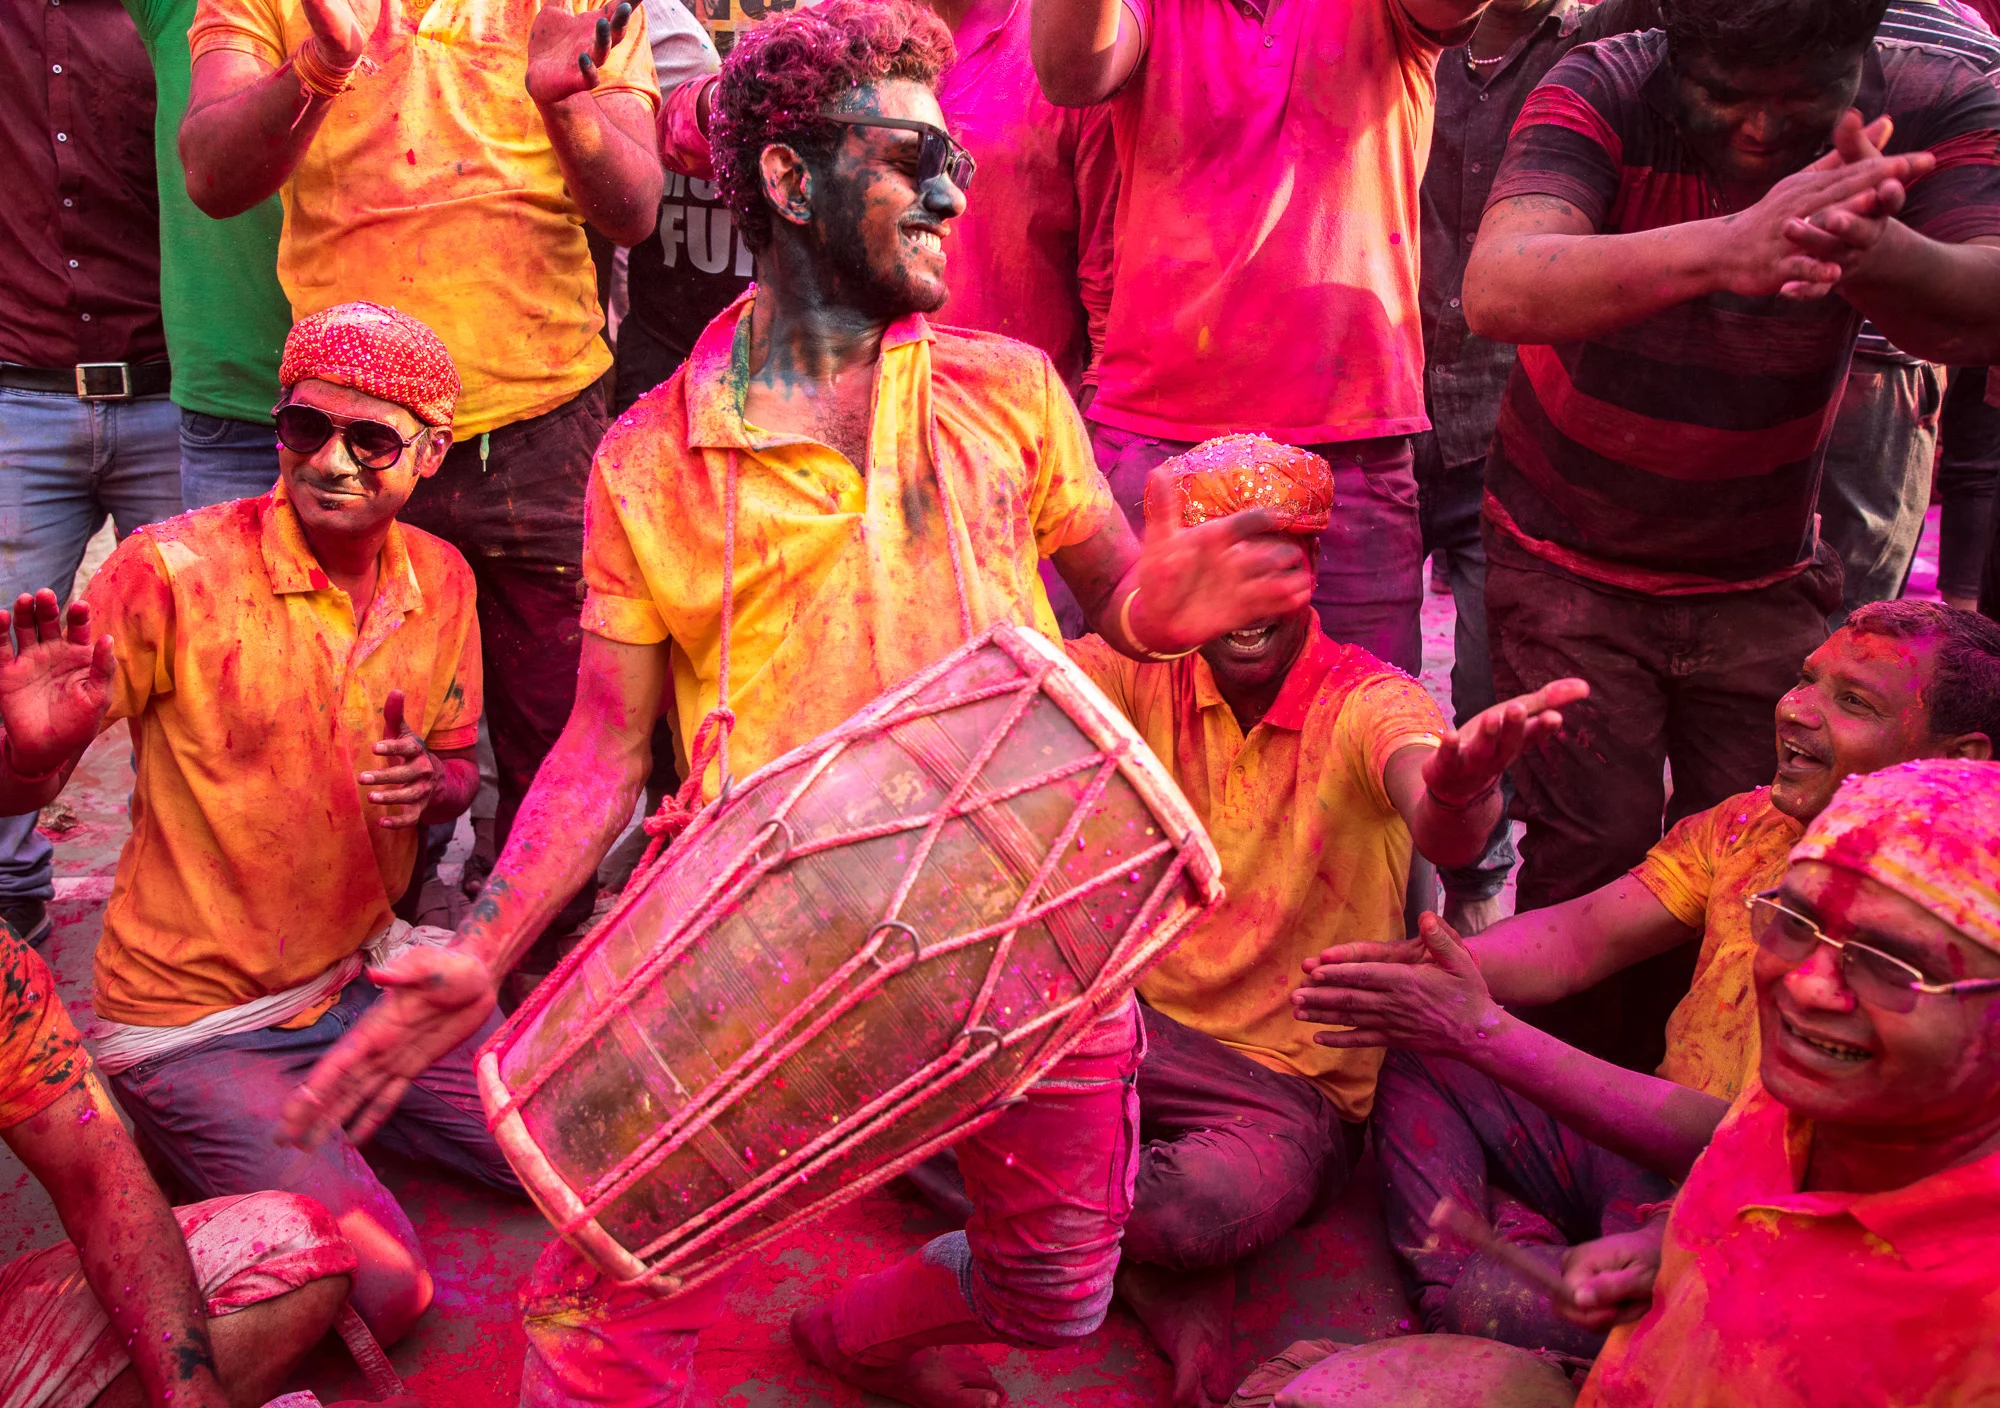
Like most people, the Festival of Colors first entered my awareness through pictures I came across on the internet & social media. After putting my eyeballs back in my head after the first time I saw those insanely colorful images, my first thoughts were: What is THAT?!?! WHERE is That?!?! and HOW do I get there?!?! I eventually made it to Holi and, for once, reality lived up to the hype. Maybe you’ve seen similar photos and asked some of the same questions. I’m going back to photograph my third Holi Festival in March 2020 (join me!), so I thought I would share some knowledge and lessons from my past experiences.
Photographing India’s Holi Festival of Colors
The World’s Most Photogenic Festival
Is India’s Holi Festival of Colors the most photogenic celebration on the planet? Answers to questions like this are obviously matters of opinion. Since I'm writing this article, you can probably guess my opinion, but then again, I haven’t made it to Carnival in Rio, Dia de los Muertos in Oaxaca, or Burning Man in the Black Rock desert…yet.
Like most people, the Festival of Colors entered my awareness through pictures I came across on the internet & social media. After putting my eyeballs back in my head the first time I saw those insanely colorful images, my first thoughts were: What is THAT?!?! WHERE is That?!?! and HOW do I get there?!?! I eventually made it to Holi and, for once, reality lived up to the hype. Maybe you’ve seen similar photos and asked some of the same questions. I’m going back to photograph my third Holi Festival in March 2020 (join me!), so I thought I would share some knowledge and lessons from my past experiences.
What is Holi?

This annual celebration of the arrival of Spring goes back nearly two thousand years and has multiple meanings and purposes. It is closely associated with the Hindu gods Krishna and Vishnu and has its origins in a mythical allegory about the triumph of good over evil. The chaos of colors we see every year on Instagram mostly happens on a single day, but the actual festival lasts about a week and includes many other traditions like the bonfire burning of an effigy and the sharing meals & sweets with friends and family.
At its culmination, enthusiastic revelers 'play Holi' with handfuls of colored powders – throwing, rubbing, and smearing vivid hues over everyone and everything. Holi is not a spectator sport. Participation is mandatory. Rich, poor, tourist or local, no one is exempt – not even sacred cows. But it's all in the spirit of celebration and good fun. In fact, another name for Holi is the Festival of Sharing Love.
Check out this article for more details about the history and meaning of Holi. Wikipedia also has a pretty good Holi page

When is Holi?
The answer to this question isn’t nearly as straightforward as you might expect. That’s because the dates of Holi change from year to year based on the Hindu calendar, of which there are several versions, and the full moon in early Spring. It’s a bit complicated and the truth is even most Indians couldn’t tell you the exact dates of the next Holi more than a few months out. This makes planning your Holi Festival photography trip a little challenging, but not insurmountable. Start by blocking out late Feb/early March on your calendar and keep googling ‘Holi Festival dates 20XX' By about 9 or 10 months out, a consensus will form. Wait until you see the same dates from at least 2 or 3 different sources before you book any flights. Yeah, I wish I could be more definite too.
Just to add a little more spice to your Holi curry, there is a very special version of Holi, Lathmar Holi, which occurs a week before the official 'Main Holi' color party. It happens over two days in two tiny villages, Barsana and Nandgoan, the historical hometowns of Lord Krishna and his beloved, Radha. Now here’s the pro tip and your reward for reading this far: Photographically, Lathmar Holi is where it’s at!
I’ve been to both, but I skip the better known Main Holi celebrations on my photo workshops and focus on Lathmar Holi because there are simply more and better photo opportunities there, IMHO🙏🏽. The light, vantage points, certain activities that only occur during Lathmar Holi, plus the fact that the color throwing revelry lasts two full days make it an easy choice for me.
Since they are spaced a week apart, there’s no reason you couldn’t attend both Lathmar Holi in Barsana/Nandgoan and Main Holi in Mathura/Vrindavan – if the Holi festival is the sole purpose of your trip. But there’s so much more to see in India. My recommendation is to shoot Lathmar Holi for two full days and then move on. It’s very likely that wherever you are on Main Holi day a week later, they will be playing Holi there too, so you’ll get another shot (pun intended) at it anyway.


Where is Holi?
These days, Holi is celebrated throughout India and beyond, but its roots are in northern India and that’s where you’ll see the biggest celebrations. Every Holi guide you read will tell you that the epicenters of the festivities are in the towns of Vrindavan & Mathura, both several hours drive from Delhi. This is true, these towns receive the most visitors, but as I mentioned, they are not necessarily the best places to capture the essence of Holi with your camera.
Barsana and Nandgoan are also in the general vicinity of Delhi. That’s why I say it makes sense to chose one and move on - you would have to stay around Delhi for over a week to catch both celebrations and there’s so much more to see in India. Whichever event you choose, the festivities will be focused around one temple in each town, usually the one dedicated to Lord Krishna. No need to ask for directions once you arrive. Just go with the flow, the crowd will carry you along.
How do I protect my Camera?
First, no photographer worth their salt should pass on the opportunity to capture this unique spectacle – Holi was made for making pictures! At the same time, the ultra fine powders (and liquids) that fill the air threaten to gift your camera with a permanent rainbow filter, or worse. Precautions must be taken. Fortunately, the solutions are easy, cheap and effective.
First, no changing lenses. Choose your weapon and stick to it for the day. For me, that means my 24-105mm zoom lens on a full frame body. If you're a prime lens prima donna who wouldn’t be caught dead with a pedestrian zoom, you have a choice to make: wide angle for crowds, portrait lens for close ups, or something in between. Personally, I don’t get limiting yourself like that, but to each her own. You gotta live with your pictures and I aint yo’ mama.
Next, a clear glass or UV filter to protect the front lens element. Put it on and leave it on…not much else to say.
Finally, a camera rain cover. There are many to choose from and some can cost a pretty penny, but this is the rare case where cheaper is actually better. This one is the best I’ve found and it only costs about $8 for a package of 2!
Holi-proofing your camera
In addition to your rain cover, you’ll need your lens hood, UV filter, scissors and a little masking tape.
Step 1 - attach the UV filter and lens hood to the front of your lens.
Step 2 - Remove the viewfinder eyecup thingy from your camera and set it aside for the moment.
Step 3 - Modify the rain cover - I don’t trust the drawstring to seal around the lens so I cut it off with scissors
Step 4 - Install the raincover per the instructions on the package. This involves stretching the hole in the rain cover around your camera eyepiece
Step 5 - Tape the front of the raincover (the part you just cut off the drawstring) to the lens shade. Seal completely - your tape job shouldn’t contain any gaps where powders or liquids could enter.

“That’s Wrap! - our pre-festival preparations."
Is Holi Safe?
During Holi, strangers, often children, will walk up to you with a big smile and smear a handful of dayglo dust all over your face and hair, usually accompanied by the greeting/cheer, "Happy Holi!" Close your eyes and mouth, smile to yourself, and go with it – there’s absolutely no malice intended. Once you've done that a time or two, you’ll be in the spirit of Holi. Wearing sunglasses to protect your eyes and carrying a small towel to wipe them out in case any irritants do get in are also smart strategies. Locals also apply oils (olive oil works well) or moisturizer to their skin and hair in advance of the festivities to make color removal easier. Wear disposable clothing. Beyond that, the main thing to avoid is getting crushed by the crowd.
On the main Holi day, the tempo slowly builds from early morning as people arrive in town and start making their way towards the temple. People will be playing Holi in the streets and alleys leading to the temple. This is all completely safe. Sometime in the late morning, the temple will close for several hours and everyone inside will be asked to leave. A crowd starts building almost immediately in front of the temple doors in anticipation of its afternoon re-opening. This is the part where some caution is required. The crowd quickly grows large and dense – if you suffer from even a hint of claustrophobia or are averse to being smushed by hundreds of sweaty strangers, you will want to skip this part of the celebrations and hang out in the quieter side streets until the temple re-opens and the crowd disperses.
Finally, if you’ve done your research, you’ve undoubtedly come across mentions of Bhang - the marijuana milkshake that is another Holi tradition. It’s easy enough to find if you look, but among the locals, those that partake are a minority and, in my experience, stoners rarely really represent a threat, here or anywhere else.
What Else Should I Know?
Have fun! That’s what Holi is all about. It’s easy get so caught up in making images that you miss the real experience. Look around, the only frowns you will see will probably be on the faces of photographers squinting at the backs of their cameras. Do a quick self-check once in a while. if your face isn’t wearing a huge grin, you’re doing something wrong. Dance a little, or drop a few rupees on some colored powders and play a little Holi yourself, with friends or strangers. Photographically, remember to check and wipe off the front of your UV filter from time to time and don’t be afraid to explore the nooks and crannies of the temple, side alleys or shops. In travel photography, as in life, bravery tends to be rewarded.
Have you ever attended a Holi Festival? Do you have another favorite festival to photograph? I’d love to hear about your experiences in the comments.
Your Next Breakthrough Won’t Be Your Next Camera
Craft has its place in the image making process and it’s an important one. Who can deny that Photoshop can add pop to a picture? Or that HDR lets you capture massive dynamic range? Craft is critical… everyone should seek to master it. Craft is fully half of photography…but only half.

“The most important part of any camera is the twelve inches behind it” -Ansel Adams
I’m in love with my Canon 5D MkIV. If Canon made a lighter, mirrorless version, I would have its babies. The ironic thing is that I wasn’t crazy excited about this camera when I bought it. I just figured it was a good move to upgrade and sell my MKIII before it lost too much value. I’m being 100% honest when I say I didn’t know how many megapixels my shiny new MkIV had for the first few weeks I owned it. It took even longer before I realized the rear LCD was a touchscreen. But, like I said, I’m in love. The low light capabilities of this camera are just stunning — I can’t believe how clean my night sky photos look! And features I didn’t even know I wanted, like Wifi, GPS, and the aforementioned touchscreen are big boons to my workflow. I can shoot a picture at ISO 6400 and post it to Instagram before I get back to my car. What could be cooler than that!
But none of these things really make my pictures better — not in the sense of creating more compelling compositions, or better capturing the feeling that caused me to make the photo in the first place. That’s because, as smart as they are now, no camera can tell you what to point it at. Who knows, with everything I’m hearing about AI, maybe my next camera will tell me, “no dummy, a little to the left!” but I kinda doubt it. The same goes for other elements of the craft aspect of photography, like rules, technique, and software. No rule of composition tells you where to stand. HDR doesn’t help you figure out which shadows or highlights are worth preserving. Lightroom filters and presets will never locate the essence of a landscape.

What are you polishing?
Don’t get me wrong, craft has its place in the image making process and it’s an important one. Who can deny that Photoshop can add pop to a picture? Or that HDR lets you capture massive dynamic range? And, like I said, the low light capabilities of modern cameras make possible images we couldn’t have dreamed of just a few years ago. Craft is critical… everyone should seek to master it. Craft is fully half of photography…but only half.
The Left Brain-Right Brain Thing
So now, as my favorite Eagle, Don Henley sang, we get to the heart of the matter. Everyone knows our brains are made up of two halves – the cold inner critic, Mr. Spock left brain and the all–loving, warmth and puppies, right brain. Well, it turns out that those concepts, as well as most left brain–right brain notions ingrained in popular culture are mostly garbage. Ask any neuroscientist. What is true is that our brains have (at least) two completely different ways of thinking, perceiving and processing information. Since I don’t really care where in our noggins these ways of thinking reside, and to distance myself from discredited theories, I’ll call these ways of thinking L-mode, for Logic mode, and C-mode for Creative mode (or See mode, get it ;-)?
L-mode is language based, it thinks in words and when it comes to photography, L-mode is the King of Craft. L-mode gets f-stops and shutter speeds. L-mode likes things organized and compartmentalized. L-mode is a slave to the Rule of Thirds.
C-mode is more conceptual/visual. It doesn’t use words. Its vocabulary is comprised of images, ideas, and emotions. C-mode knows if a picture is worth anything in milliseconds and doesn’t give a damn about rules.
Here’s the problem: a very important part of the image making process – not the part where you set the f-stop and shutter speed, but the part where you recognize the photographic potential of a scene and then wrangle the essence of it into a small rectangle, boils down to design. And L-modes sucks at design. L-mode thinks it’s a good designer, or at least it thinks it can substitute rules and generalities for design. As soon as you raise your camera to your eye, L-mode jumps in and says, “step aside, I’ve got this. This is a portrait, so we need to focus on the eyes. Then I’m going to meter off the skin and overexpose by one stop. The contrast range is a bit high, so I’ll bring in a fill light, etc, etc.” L-mode focuses on all of the technical details, but doesn’t really see the picture, or more accurately, it doesn't see this picture. L-mode sees a category of picture – portraits – and says,”Ok, with portraits I'm supposed to do this, this, and this”... and proceeds to do so without regard to how those things affect this picture. It focuses on the trees, but misses the forest.

“There are no rules for good pictures, only good pictures” - Ansel Adams
C-mode is just the opposite. C-mode is a natural designer. It grasps the gestalt of images instantly. It actually sees the whole picture and says, “yup, that works"….or, "nope, that sucks"…or, "oh wow, that’s amazing.” C-mode doesn’t reference anything external to the image itself because it doesn’t know or care about anything other than what it sees in that moment. C-mode doesn’t need a rule to know if an image is worthy or not because images are its native tongue.
Taking Refuge in the Technical
But C-mode Seeing doesn’t come naturally to a lot of us. It’s unfamiliar territory and we feel clumsy stumbling around in it. Often, we're just not sure if the composition in our viewfinder is really any good. The truth is that Seeing takes practice, a lot of practice. But, hey, it’s 2019 – we expect instant gratification, we don’t wait for anything. So, we settle for old lies and the shiny promises of shiny new things. But they don’t work - there’s no magic in thirds, why should there be? And be honest: are edge to edge sharpness or more dynamic range really the missing ingredients in your pictures? Not for me either, but that doesn’t stop me from checking the Canon Rumors site every morning ;-)!
Until Next Time
Thanks for reading. This is the second article in the Art of Seeing Manifesto series. Stay tuned for the next installment, Whole Brain Photography.

Phone It In. Seriously.
It turns out that the camera in your pocket is a powerful too for developing your Photographer’s Eye and sharpening your creative vision. Since most of the technical decisions are made for you, a phone camera frees you to focus on the image, which, after all, is what really counts.
The other day, on the home stretch of my morning run, I stopped to snap a photo. The dense fog that morning gave everything around Ballona Creek a mysterious, ethereal look. The diffused sun rising across the water looked interesting, so I pulled my phone out of my pocket and clicked a few frames. Hmm, not as cool as it looked, I thought reviewing my images on screen. Oh well. Then I noticed the bridge, that looked cool too. Maybe that will make a better picture. A couple more snaps. I should get lower, I thought. So I picked my way down the rocks lining the creek bank. More snaps...a little better. I need to get home and start my day, I thought climbing back up to bike trail. Just then, a cyclist whizzed by and disappeared into the fog. Wow, that looks cool...just need to wait for another biker. You see where this is going, right? An hour and 159 snaps later I thought, I really have to get home. I ended up with a handful of keepers from that morning, mostly courtesy of a lovely egret hanging out on the docks. So I guess my point is partly about serendipity, which has a way of showing up whenever you follow your instincts. But it’s also about how easy it is to slip into what I call C-mode (creative mode) when you are shooting with your phone. That’s a good thing.
It turns out that the camera in your pocket is a powerful too for developing your Photographer’s Eye and sharpening your creative vision. Since most of the technical decisions are made for you, a phone camera frees you to focus on the image, which, after all, is what really counts. It also removes a lot of the creative pressure of doing 'serious photography', which ironically makes you more creative. I know I feel a lot more instinctive and spontaneous when I'm shooting with my iPhone. For those pixel peepers obsessed with image quality ('IQ'), I agree we haven't reached DSLR quality in our smartphone cameras yet, but let me ask you: How many iPhone billboards did you drive under this week? Those 20X50 foot (printed) images really were shot on a phone. Just how much 'quality' do you need?


One key to making great images with your phone camera is taking an intentional approach when you shoot. In other words, be serious, but don't take it so seriously. Lighten up, but make conscious choices. Pay attention to framing and backgrounds. Try variations. But mostly, give your brain a break and listen to your gut. Look at your images and notice your first reaction but don’t analyze too much. Let yourself be lost in that wordless state where you’re feeling more than thinking. If you can’t remember later what you were thinking when you took those pictures, you did it right.
To see more examples of smartphone camera photos, check out Ken's iPhoneography Gallery
I'd love to see some your favorite phone images. Post a link in the comments or upload your images to Instagram with hashtags #phoneitin and #artofseeing
My 'Aha' Moment
Up to that point, I had harbored some doubts about whether I really had ‘it' as a photographer…In general, my photographs were technically sound, but totally uninspiring and I knew it. I did have a few photographs I was proud of, but maybe I just got lucky those times.

drawing-right-side

line-drawing
"To look at a thing is very different from seeing it" - Oscar Wilde
Maybe the best way to start off this discussion is to relate how I came to see the light, so to speak. I was in my last year of photography school and a bit annoyed that the instructor of this particular class (Advanced Illustration Photography as I recall) had included "Drawing on the Right Side of the Brain" by Betty Edwards in the syllabus. After all, we were there to learn photography, not how to draw. Up to that point, I had harbored some doubts about whether I really had ‘it' as a photographer. I mean I loved photography, no question. So much so I wouldn't hesitate to call it a burning passion. And I knew the difference between good images and not so good ones. But my own work felt lacking. I had learned well all of the lessons about lighting patterns and contrast ratios and color temperature. I mastered maintaining detail in the shadows and highlights. In general, my photographs were technically sound, but totally uninspiring and I knew it. I did have a few photographs I was proud of, but maybe I just got lucky those times. So there I was, trying to learn how to translate my passion for photography into images with passion, and this instructor wanted me to waste my precious time on a book about drawing. I had no talent in this area and even less inclination to learn. But I couldn't help being totally floored when one of the first exercises I attempted yielded the best drawing I had ever made in my life. The exercise involved copying a picture out of the book with the twist that the picture was presented upside down. Probably the only reason I completed the exercise was that the instructor was literally walking around looking over our shoulders. But when I finished and turned my copy right side up, I couldn't stop staring at the piece of paper in front of me. What I saw was a very reasonable copy of the original drawing and certainly the best drawing I had ever made in my life! Why would drawing a picture upside down make such a difference in my drawing abilities? The answer, it turns out, was that when the drawing was upside down, I couldn't use the stored concepts in my head of what a nose, eyes, mouth, lips, etc. look like. Instead, I was forced to really see what was there.
Betty Edwards is a professor of art that taught drawing for many years and came to the conclusion that everyone has the ability to draw reasonably well, they just need to be taught how to see correctly. Through a series of exercises, she teaches us that there are really two ways of seeing and that looking at things the 'right' (right brain) way is the key to drawing well. I believe it is the key to photography as well. I have also come to believe that what we call art and creativity is just the language of the right brain mode of seeing/thinking. It is a language without words; a language that we all innately understand but sometimes need help speaking. That day in class was a turning point in my approach to photography. I realized then that technique and equipment had very little to do with making good images. Since then, it's been an ongoing journey to better understand the whole creative process and apply the knowledge to my photography. I have come across some great teachers and gained some of my own insights as well. I plan to use this space to discuss this journey. I'd love to hear your thoughts and experiences as well.